
The Ultimate Guide To Change Admin Password in WordPress & Enforcing Security

One of the most important aspects of maintaining a WordPress site is ensuring its security. A critical part of that security involves regularly updating your WordPress password.
This practice is vital in protecting your website from hacking attempts and unauthorized access. In this guide, we'll walk you through all the methods available to change your WordPress admin and administrator password once, from the simplest to the more technical.
TABLE OF CONTENTS
- Changing Admin Password from the WordPress Dashboard
- Resetting WordPress Password via Email
- Using phpMyAdmin or Adminer to Change WordPress Admin Password
- Changing Password via FTP
- Using the Emergency Password Reset Script
- Changing WordPress Password Through WP-CLI
- Two-Factor Authentication for Added Security
- WordPress Password Protection Best Practices
- Using a Plugin to Manage Passwords
- Modifying Functions.php File
- Enabling HTTPS
- Regularly Updating WordPress
- Enforcing Strong WordPress Passwords for All Users
- Regular Backups
- Using Security Plugins
- Limiting Login Attempts
- Changing Your Username
- Regularly Auditing User Accounts
- Disabling XML-RPC
- Installing a Web Application Firewall (WAF)
- Regular Security Scans
- Enable HTTP Security Headers
- Disable File Editing in WordPress
- Use SSL for WordPress Login
- Use Security Questions for WordPress Login
- Protect the wp-config.php and .htaccess Files
- Regularly Monitor Your Site's Activity
- Use a VPN
- Protect Your Computer
- Restrict Access to WP-Admin Directory
- Use a Content Delivery Network (CDN)
- Conclusion
Changing Admin Password from the WordPress Dashboard
This is the simplest and most common method of changing your WordPress admin password.
Step 1: Log into your WordPress admin dashboard. Typically, you can access WordPress login page by appending '/wp-admin' to your website's URL.
Step 2: On the left side menu, click on 'Users'. Then, select 'Your Profile'.
Step 3: Scroll down to the 'Account Management' section. You'll find the 'New Password' option here.
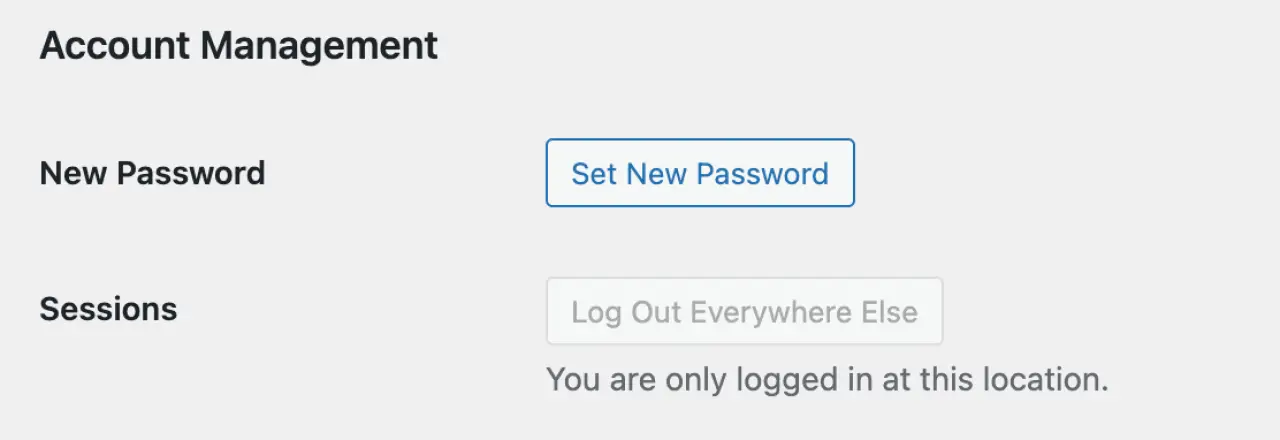
Step 4: Click the 'Generate Password' button.
WordPress will automatically create a strong WordPress password for you. You can use this one or type your very own password into the box.
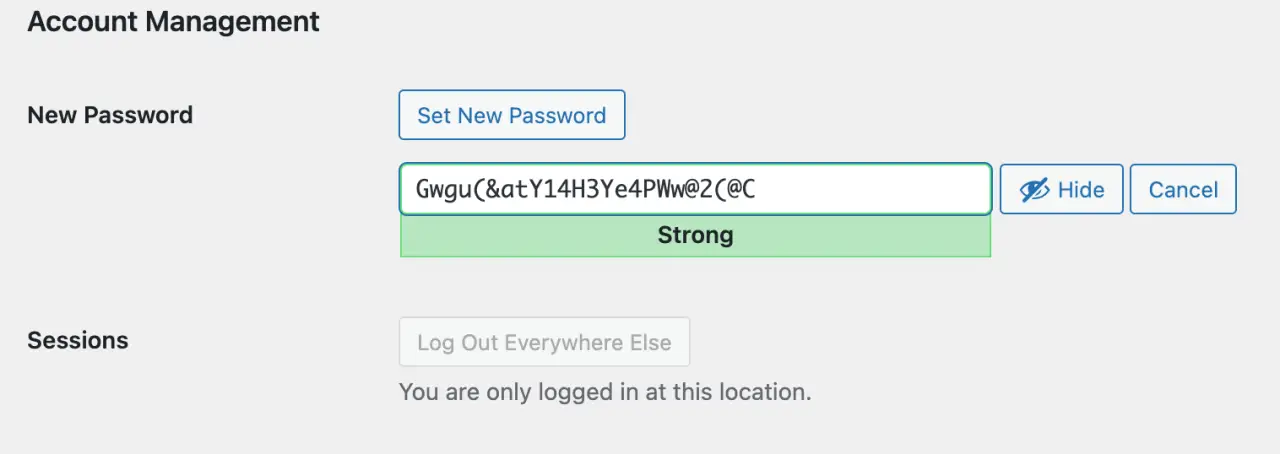
Step 5: If you chose to use your own WordPress password, make sure it's strong and unique.
Step 6: Once you're satisfied with your password, click the 'Update Profile' button at the bottom of the page.
Resetting WordPress Password via Email
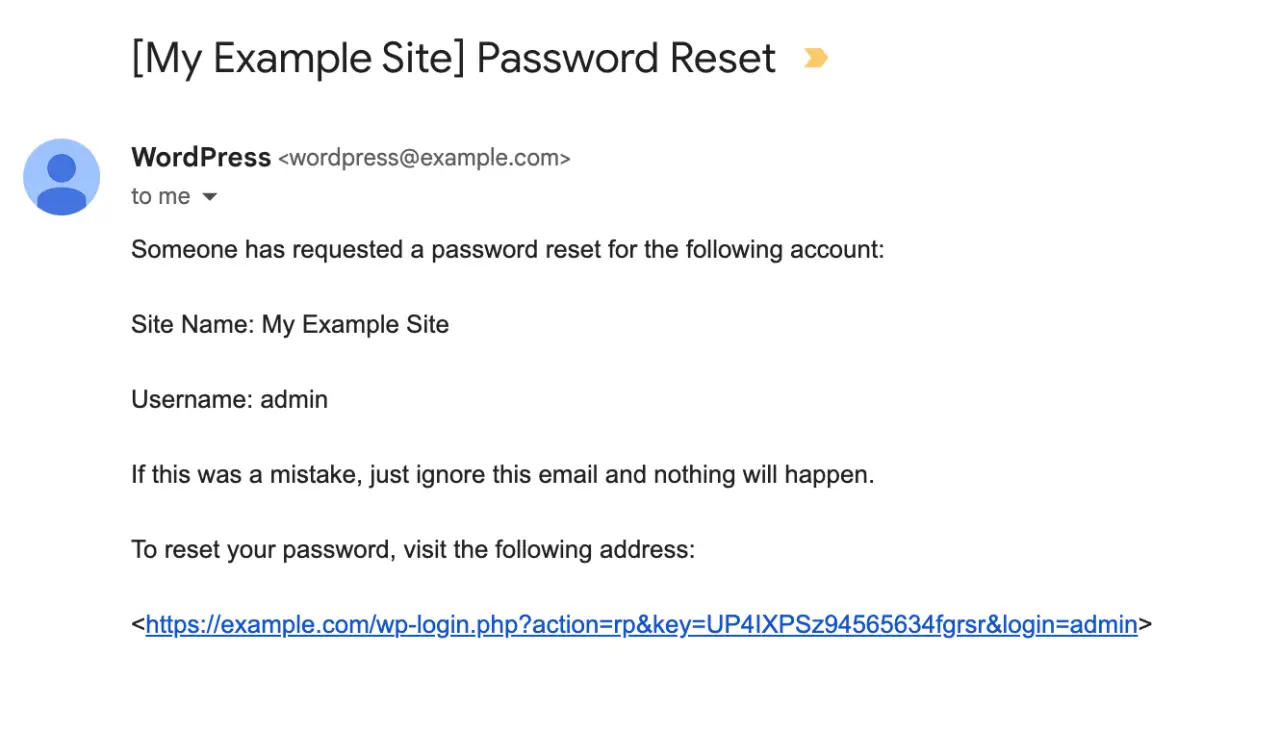
If you have lost your password and're unable to access your dashboard, WordPress provides a built-in, password reset email and recovery feature via email that you can use to reset password.
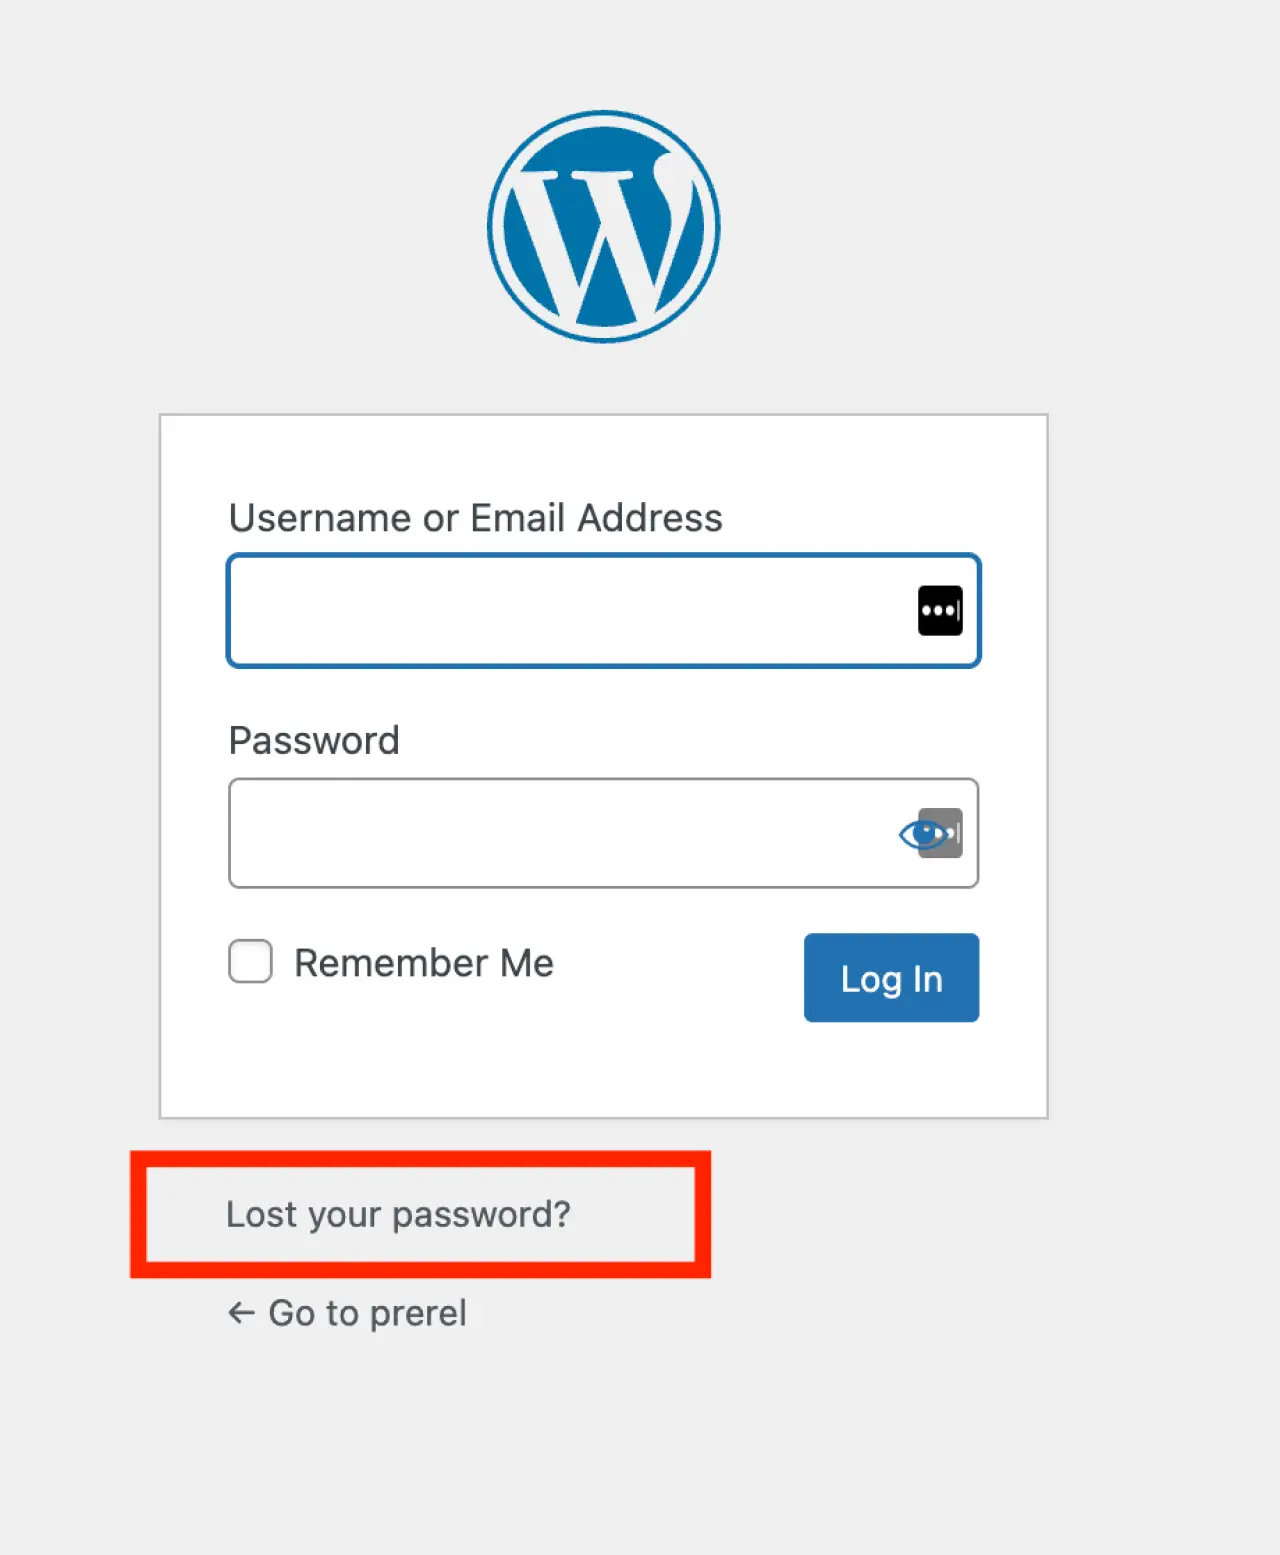
Step 1: Go to your WordPress login page (the page with the form and the WordPress logo).
Step 2: To reset password, click on the lost password link named: 'Lost your password?'.
Step 3: On the next screen, enter your username or email address associated with the admin account, then click 'Get New Password'.
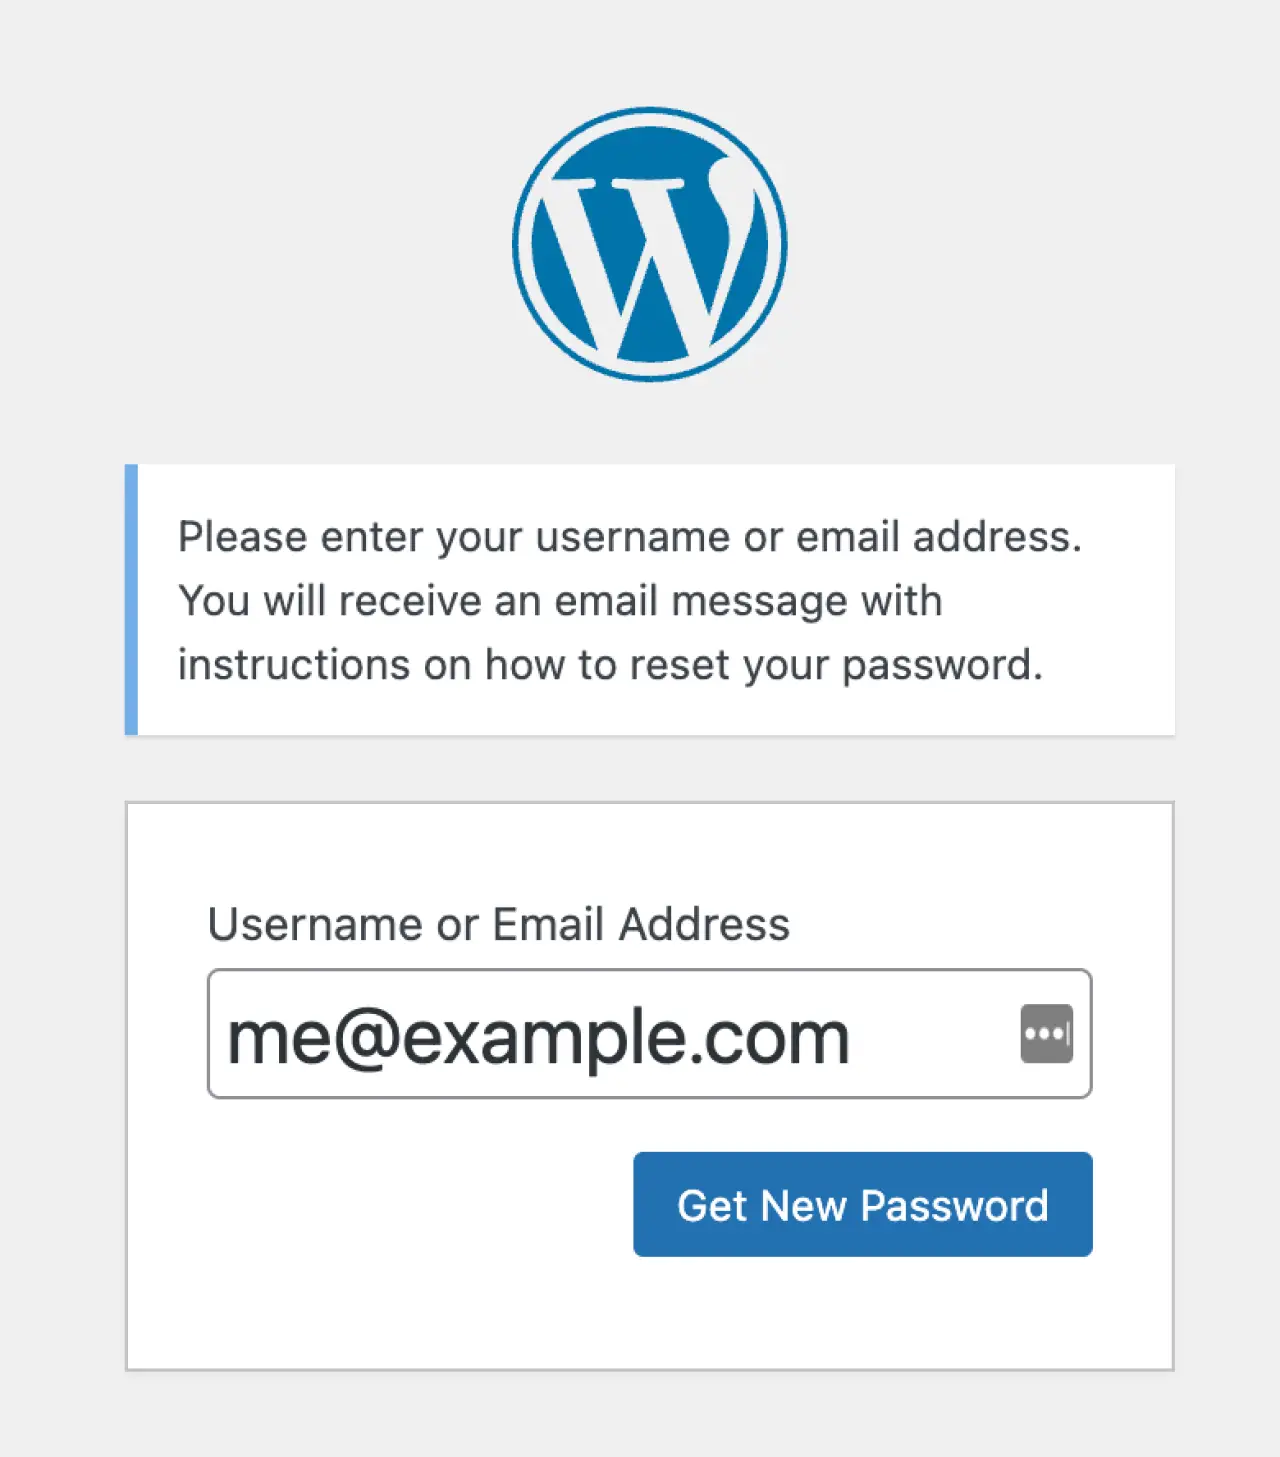
Step 4: You will receive an email with a lost password link to reset your WordPress password and set a new password.
Click this forgot password link and follow the instructions to the reset password button set a new WordPress password.
Using phpMyAdmin or Adminer to Change WordPress Admin Password
In some situations, you might not be able to reset your WordPress password via the administrator's email address. In such cases, you can use phpMyAdmin or Adminer to change your password directly in the WordPress database.
Please note that this method is a bit technical and should be done carefully.
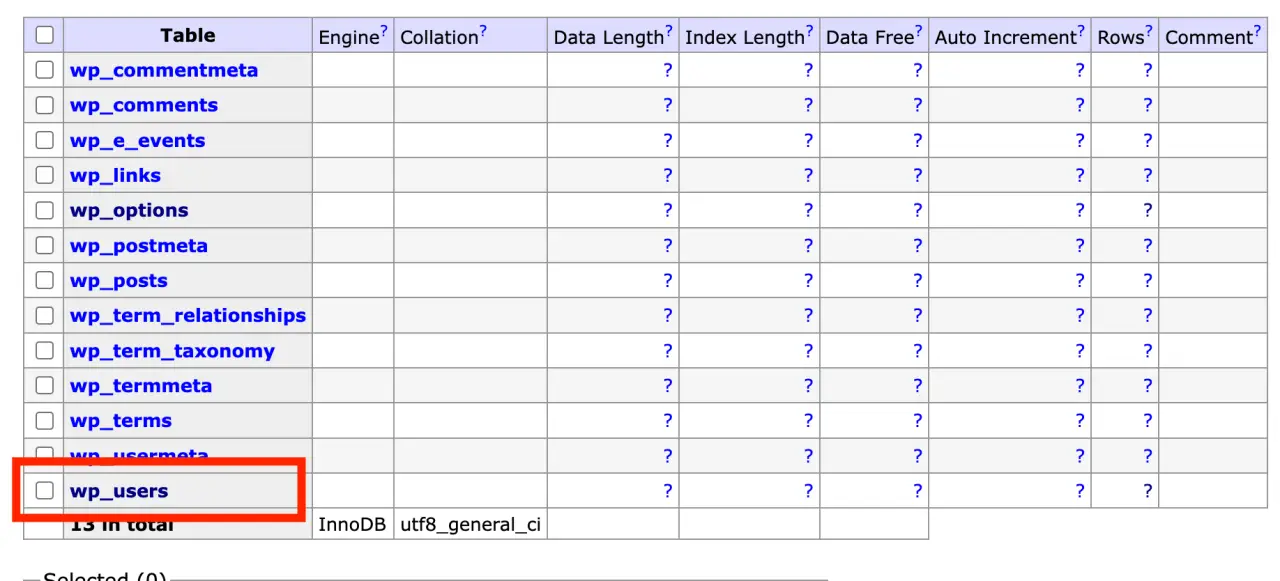
Step 1: Log into your hosting account and access phpMyAdmin or Adminer (in our example) DB client.
Step 2: Click on your WordPress database. Typically, it starts with 'wp_'.
Step 3: Find the 'wp_users' table and click on it.
Step 4: Locate your admin username and click the 'Edit' button next to it.
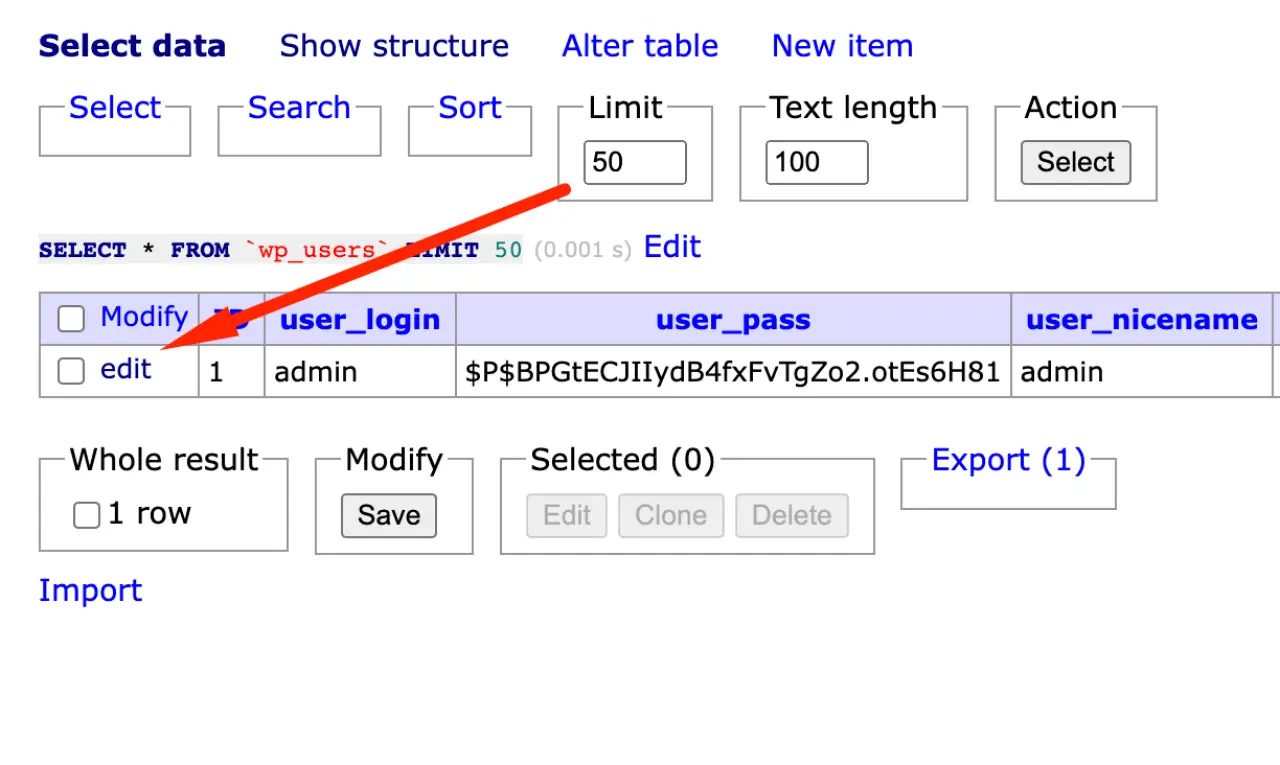
Step 5: In the 'user_pass' field, enter your new password.
Step 6: From the drop-down menu in the same row, select 'MD5'. This will ensure your WordPress password is encrypted in the database.
Step 7: Click the 'Save' (Adminer) or 'Go' (PHPMyAdmin) button at the bottom to save changes.
Changing Password via FTP
This is the most advanced method and should be used if all other options fail or aren't accessible. It involves creating a new PHP file to reset your WordPress password.
Step 1: Connect to your website using an FTP client.
Step 2: Navigate to the /wp-content/ folder.
Step 3: Create a new PHP file (let's call it reset.php) and edit it.
Step 4: Paste the following code into the file:
<?php
require('wp-blog-header.php');
$userdata = array(
'ID' => 1,
'user_pass' => 'YourNewPassword'
);
wp_update_user($userdata);
echo 'Changed password!';
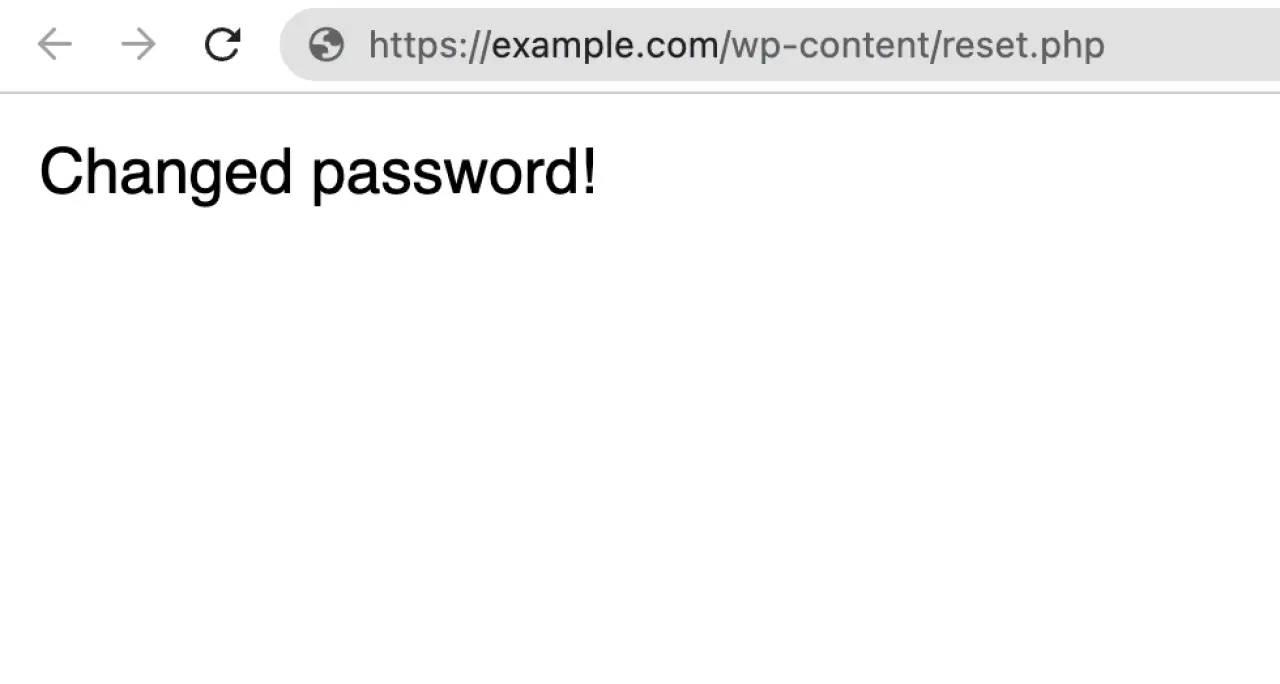
?>Replace 'YourNewPassword' with your new desired WordPress password.
Step 5: Save the file and upload it to the /wp-content/
Step 6: Run the script by navigating to https://example.com/wp-content/reset.php
Step 7: If everything went right, you'd see the message 'Changed password!'. Remember to delete the reset.php file once you regain access.
Using the Emergency Password Reset Script
This method should only be used if you're comfortable editing PHP files. The emergency password reset script is not a plugin, but a PHP script that directly communicates with the WordPress back-end.
Step 1: Copy the Emergency Password Script from the official WordPress Codex.
Step 2: In a text file, paste the script you copied and save the file as "emergency.php".
Step 3: Upload this file to your WordPress root directory via FTP.
Step 4: Open a browser and go to https://example.com/emergency.php
Step 5: Follow the instructions on the screen to change the WordPress password.
Step 6: Once you have successfully changed the password, delete the 'emergency.php' file from your server for security purposes.
Changing WordPress Password Through WP-CLI
If you have shell access to your server, WordPress comes with a command-line interface tool known as WP-CLI which you can use to manage your site.
Step 1: Log into your server via SSH.
Step 2: Navigate to your WordPress root directory.
Step 3: Use the following command to change the WordPress password:
wp user update username --user_pass=new_passwordReplace 'username' with your admin username and 'new_password' with your new desired password.
Two-Factor Authentication for Added Security
While not a method of not changing your WordPress password or the admin password, two-factor authentication (2FA) adds an extra layer of security to your WordPress login screen.
Step 1: Install a 2FA plugin such as Google Authenticator - WordPress Two Factor Authentication (2FA, Two-Factor, or Wordfence Login Security.
Step 2: Follow the plugin instructions to set up 2FA. This usually involves scanning a QR code with a 2FA app on your mobile device.
Step 3: The next time you log in, you'll need to enter a unique code from your 2FA app along with your username and password.
This means that even if someone guesses your password, they won't be able to log in without the 2FA code.
WordPress Password Protection Best Practices
For optimal security, here are some best practices for managing your WordPress admin password:
- Use Strong Passwords: The stronger your WordPress password, the harder it is to guess or brute force. A strong password should be long and include a combination of upper and lower-case letters, numbers, and symbols.

- Change WordPress Passwords Regularly: Regularly updating your password can help keep your site secure, especially if a WordPress password somehow ends up in the wrong hands.

- Avoid Common Passwords: Never use common passwords like 'password', '123456', or 'qwerty'. These are easily guessable and provide almost no security.

- Use Unique Passwords: Never reuse WordPress passwords across multiple WordPress sites or accounts. If one WordPress account is compromised, all accounts using the same password are at risk.

- Use a Password Manager: A password manager can generate and store strong, unique WordPress passwords for you, so you don't have to remember them all.
Using a Plugin to Manage Passwords
There are several plugins available that can simplify password management on your WordPress site.
These plugins provide options for enforcing strong WordPress passwords, setting password expiration periods, and more.
Step 1: Install a password management plugin such as Password Policy Manager or 'WP Password Policy Manager'.
Step 2: Configure the plugin's settings according to your needs. You can set password expiration dates, enforce specific password strength requirements, and more.
Step 3: The plugin will then enforce these rules, prompting users to update their WordPress passwords as necessary.
Modifying Functions.php File
If you have access to your WordPress files, you can add a simple function to force a password or change the password once.
However, be extremely careful when editing these files as errors can break your site.
Step 1: Access your theme's files through an FTP client or your hosting control panel.
Step 2: Locate and open the 'functions.php' file.
Step 3: At the end of the file, add the following code:
wp_set_password('new_password', 1);Replace 'new_password' with your new WordPress password. The '1' is the user ID for the admin user.
Step 4: Save and upload the 'functions.php' file. The next time the admin logs in, they will need to use the new password.
Step 5: Make sure to remove the code after you've logged in to prevent the other user's password again from being reset every time a page loads.
Enabling HTTPS
Enabling HTTPS for your site ensures that data, including passwords, is encrypted during transmission.
This prevents hackers from intercepting your password when you log in.
Step 1: Obtain an SSL certificate. Many hosting providers offer free certificates via Let's Encrypt.
Step 2: Install the SSL certificate on your server. Your hosting provider can usually help with this.
Step 3: In your WordPress dashboard, go to 'Settings' > 'General'.
Step 4: Update the 'WordPress Address (URL)' and 'Site Address (URL)' to use 'https' instead of 'http'.
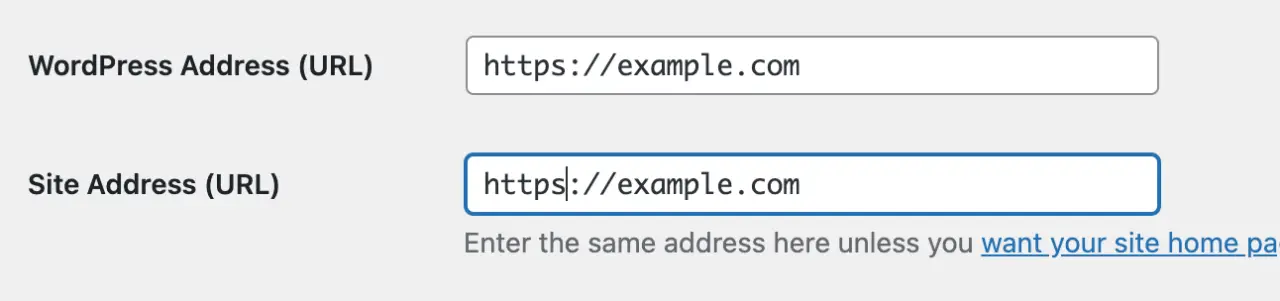
Step 5: Save changes. Your site should now be using HTTPS.
Regularly Updating WordPress
Regular WordPress updates are crucial for site security. Each update not only brings new features but also fixes security issues that could be exploited.
Step 1: Log in to your WordPress dashboard.
Step 2: If there's an update available, you'll see a notification at the top of the dashboard. Click on 'Please update now'.
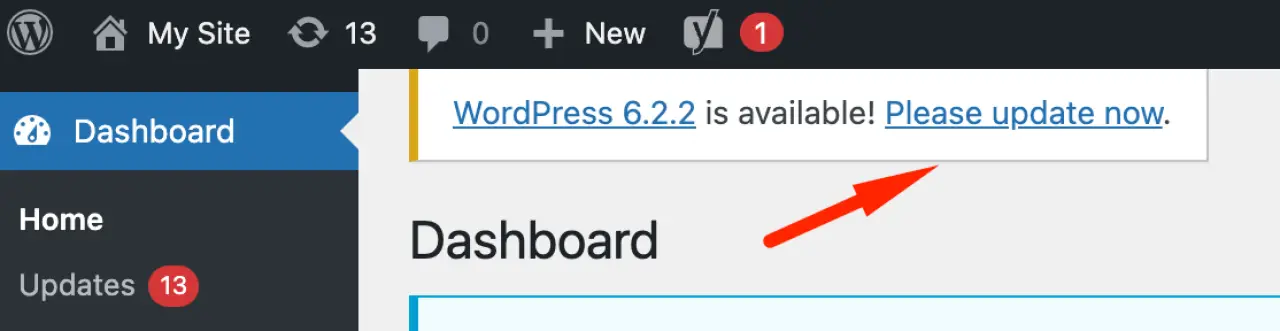
Step 3: You'll be taken to the 'Updates' page. Click on 'Update Now' to update WordPress to the latest version.
Remember, it's not just the WordPress core that needs updating; plugins and themes also need to be kept up-to-date for optimal security.
Enforcing Strong WordPress Passwords for All Users
If your WordPress site has multiple users, it's essential to enforce strong passwords for all of them to ensure your site's overall security.
You can do this with some plugins, but we also recommend using a custom-coded solution:
Step 1: Add this code to functions.php
<?php
    // Enforce strong passwords.
    require_once dirname(__FILE__) . '/functions-strong-passwords.php';
?>
Step 2: Create a file functions-strong-passwords.php with the content:
<?php

/**
 * Enforce strong passwords (ESP) for all website users.
 *
 * https://wp-tutorials.tech/optimise-wordpress/enforce-strong-passwords-without-a-plugin/
 *
 * To disable enforcing strong passwords:
 *   define('ESP_IS_ENABLED', false);
 */

defined('WPINC') || die();

/**
 * Initialise constants and handlers.
 */
function esp_init() {
    if (defined('ESP_IS_ENABLED') && (ESP_IS_ENABLED === false)) {
        // Disabled by configuration.
    } else {
        add_action('user_profile_update_errors', 'esp_user_profile_update_errors', 0, 3);
        add_action('resetpass_form', 'esp_resetpass_form', 10);
        add_action('validate_password_reset', 'esp_validate_password_reset', 10, 2);
    }
}
add_action('init', 'esp_init');

function esp_user_profile_update_errors($errors, $update, $user_data) {
    return esp_validate_password_reset($errors, $user_data);
}

function esp_resetpass_form($user_data) {
    return esp_validate_password_reset(false, $user_data);
}

/**
 * Sanitise the input parameters and then check the password strength.
 */
function esp_validate_password_reset($errors, $user_data) {
    $is_password_ok = false;

    $user_name = null;
    if (isset($_POST['user_login'])) {
        $user_name = sanitize_text_field($_POST['user_login']);
    } elseif (isset($user_data->user_login)) {
        $user_name = $user_data->user_login;
    } else {
        // No user specified.
    }

    $password = null;
    if (isset($_POST['pass1']) && !empty(trim($_POST['pass1']))) {
        $password = sanitize_text_field(trim($_POST['pass1']));
    }

    $error_message = null;
    if (is_null($password)) {
        // Don't do anything if there isn't a password to check.
    } elseif (is_wp_error($errors) && $errors->get_error_data('pass')) {
        // We've already got a password-related error.
    } elseif (empty($user_name)) {
        $error_message = __('User name cannot be empty.');
    } elseif (!($is_password_ok = esp_is_password_ok($password, $user_name))) {
        $error_message = __('Password is not strong enough.');
    } else {
        // Password is strong enough. All OK.
    }

    if (!empty($error_message)) {
        $error_message = '<strong>ERROR</strong>: ' . $error_message;
        if (!is_a($errors, 'WP_Error')) {
            $errors = new WP_Error('pass', $error_message);
        } else {
            $errors->add('pass', $error_message);
        }
    }

    return $errors;
}

/**
 * Given a password, return true if it's OK, otherwise return false.
 */
function esp_is_password_ok($password, $user_name) {
    // Default to the password not being valid - fail safe.
    $is_ok = false;

    $password = sanitize_text_field($password);
    $user_name = sanitize_text_field($user_name);

    $is_number_found = preg_match('/[0-9]/', $password);
    $is_lowercase_found = preg_match('/[a-z]/', $password);
    $is_uppercase_found = preg_match('/[A-Z]/', $password);
    $is_symbol_found = preg_match('/[^a-zA-Z0-9]/', $password);

    if (strlen($password) < 8) {
        // Too short
    } elseif (strtolower($user_name) == strtolower($password)) {
        // User name and password can't be the same.
    } elseif (!$is_number_found) {
        // ...
    } elseif (!$is_lowercase_found) {
        // ...
    } elseif (!$is_uppercase_found) {
        // ...
    } elseif (!$is_symbol_found) {
        // ...
    } else {
        // Password is OK.
        $is_ok = true;
    }

    return $is_ok;
}
?>
For more details about this solution, check out this post and the author of the code:
https://wp-tutorials.tech/optimise-wordpress/enforce-strong-passwords-without-a-plugin/
Regular Backups
While not directly related to changing passwords, regular backups are another critical security measure for any WordPress site.
If anything goes wrong, having a recent backup can save you a lot of time and stress.
Step 1: Choose a backup plugin such as 'UpdraftPlus', 'BackupBuddy', or 'VaultPress'.
Step 2: Install and configure the plugin according to its instructions.
Step 3: Set a regular backup schedule. Depending on your site's size and how often you update it, you might want to backup daily, weekly, or monthly.
Step 4: Ensure that your backups are being stored off-site, such as in cloud storage or an external hard drive. Some plugins provide this feature built-in.
Using Security Plugins
Security plugins provide comprehensive security features, including brute force attack protection, firewall settings, and scheduled scans.
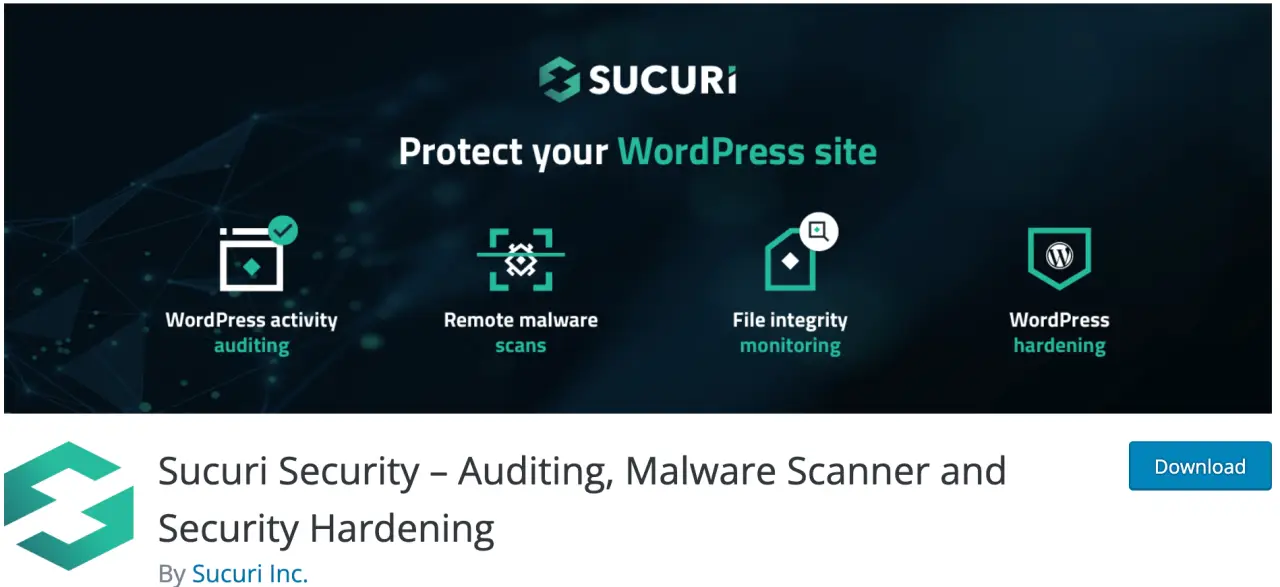
Step 1: Choose a security plugin like Wordfence, iThemes Security, or Sucuri Security.
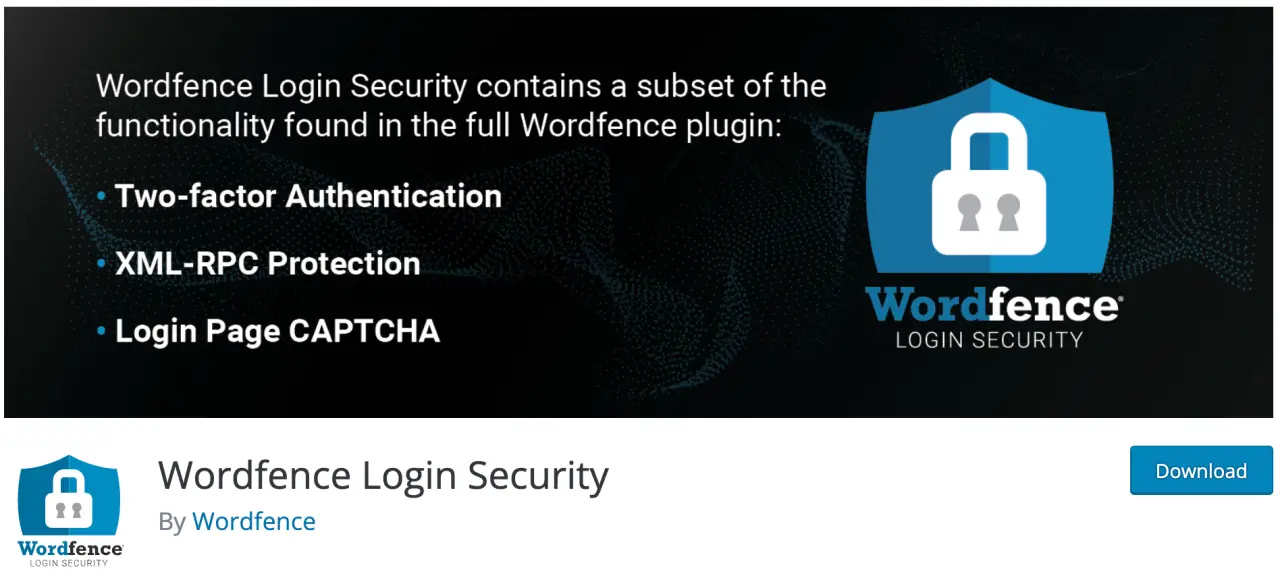
Step 2: Install and activate the plugin.

Step 3: Each plugin will have different settings, but generally, you'll want to enable firewall protection, brute force protection, and regular scans.
These plugins can also help you enforce strong and secure password- policies, limit login attempts, and more.
Limiting Login Attempts
By default, WordPress allows unlimited login attempts on the login page. This can be a security risk as it allows for brute force attacks. Using a plugin to limit login attempts can mitigate this risk.
Step 1: Install a plugin like Login LockDown or Limit Login Attempts Reloaded.
Step 2: Once activated, these plugins will limit the number of login attempts from a given IP range for a specific time period.

Step 3: After a certain number of failed attempts, the plugin will lockout the IP address for a specified time.
Changing Your Username
In addition to changing your password, changing your admin username can also improve your WordPress site's security. The default 'admin' is predictable and can make it easier for hackers to gain access to your site.

Step 1: Create a new user in WordPress with a unique username and give it administrative privileges.
Step 2: Log out of your 'admin' WordPress account and log back in with your new administrative user.
Step 3: Delete the old 'admin' user. When prompted, attribute all content from the 'admin' user to your new user.
Now, both your username and password are unique and less likely to be guessed by malicious actors.
Regularly Auditing User Accounts
Over time, you may end up with multiple user accounts on your WordPress website. Regularly auditing these accounts helps ensure that no unauthorized accounts have been created and that no former employees or contributors still have access.

Step 1: Go to 'Users' in your WordPress dashboard to see a list of all user accounts in the users table.
Step 2: Go through this list and verify each WordPress account. Remove or change the role of any account that should no longer have access.
Step 3: Regularly repeat this audit, especially if you've granted access to multiple people.
Disabling XML-RPC
XML-RPC is a feature that enables data to be transmitted, with HTTP acting as the transport mechanism and XML as the encoding mechanism. However, it can be exploited for brute force attacks. Disabling it can add an extra layer of security.
Step 1: Install a security plugin like 'Disable XML-RPC' or 'Manage XML-RPC'.
Step 2: Once activated, these plugins will disable XML-RPC.
Alternatively, if you are comfortable editing your .htaccess file, you can disable XML-RPC by adding the following lines:
# Block WordPress xmlrpc.php requests
<Files xmlrpc.php>
    order deny,allow
    deny from all
    allow from 123.123.123.123
</Files>
Replace '123.123.123.123' with your IP address if you still want to allow access from specific IP addresses.
Installing a Web Application Firewall (WAF)
A Web Application Firewall (WAF) helps protect your site by filtering out malicious requests. This includes brute force attacks, DDoS attacks, and other common WordPress threats.

Step 1: Choose a WAF provider. This could be a plugin like 'Wordfence', or a third-party service like 'Cloudflare' or 'Sucuri'.
Step 2: Follow the provider's instructions to WordPress install and set up the WAF. This will usually involve changing some DNS settings.
Regular Security Scans
Performing regular security scans can help detect any vulnerabilities or hacks.

Step 1: Install a security plugin that includes a scanning feature, like 'Wordfence' or 'iThemes Security'.
Step 2: Set the plugin to perform regular scans. You will be notified if the plugin finds any potential issues.
Step 3: Address any issues that the scan finds promptly to keep your site secure.
Enable HTTP Security Headers
HTTP Security Headers, when added, can protect your site against types of attacks like Cross-Site Scripting (XSS), Clickjacking, and other code injection attacks.
Step 1: Enable HTTP Security Headers by using a plugin like 'HTTP Headers' or manually adding them to your .htaccess file.
Step 2: If manually adding, you'll want to add headers such as:
Header set Content-Security-Policy "default-src 'self';"
Header set X-Content-Type-Options "nosniff"
Header set X-Frame-Options "SAMEORIGIN"
Header set Strict-Transport-Security "max-age=31536000" env=HTTPS
Remember, editing your .htaccess file should be done with care. Always have a backup, and make sure you know how to restore it if something goes wrong.
Disable File Editing in WordPress
WordPress allows administrators to edit the theme and plugin code directly from the WordPress dashboard. Although this is a convenient feature, it can pose a serious security risk if a hacker gains access to your WordPress admin area.
Disabling file editing can be a good practice to add an extra layer of security.
Step 1: Access your wp-config.php file via an FTP client or through your hosting provider's cPanel.
Step 2: Add the following line of code to your wp-config.php file:
define('DISALLOW_FILE_EDIT', true);Step 3: Save and upload your wp-config.php file. File editing via the dashboard will now be disabled.
Use SSL for WordPress Login
Using an SSL (Secure Sockets Layer) certificate for your WordPress login ensures that all data transfer between the user and the server is encrypted and safe from hacking attempts.

Step 1: Purchase an SSL certificate, if you haven't already. Many hosting providers offer free SSL certificates from Let's Encrypt.
Step 2: Install the SSL certificate. The steps will vary depending on your hosting provider.
Step 3: Once installed, you can force WordPress to use SSL for logins by adding the following line of code to your wp-config.php file:
define('FORCE_SSL_ADMIN', true);This line of code will force WordPress to use SSL for all admin area sessions ensuring maximum security.
Use Security Questions for WordPress Login
Adding a security question to your WordPress login screen can provide an extra layer of security.

Step 1: Add a code snippet to functions.php
<?php
// Adding the question to the login form
function security_question_on_login() {
    ?>
<p>
    <label for="security_question">What is 2+2? <br/>
        <input type="text" name="security_question" id="security_question" class="input" value="" size="25" /></label>
</p>
    <?php
}
add_action('login_form', 'security_question_on_login');

// Validating the answer to the question
function security_question_login_check($user, $password) {
    // Correct answer to the security question
    $correct_answer = '4';

    // Check the user's input against the correct answer
    if (isset($_POST['security_question']) && $_POST['security_question'] !== $correct_answer) {
        // If the answer is wrong, then we don't authenticate this login attempt
        return null;
    }

    return $user;
}
add_filter('authenticate', 'security_question_login_check', 30, 2);

?>
Step 2: Change the security to something you like to add instead.
Protect the wp-config.php and .htaccess Files
The wp-config.php file contains sensitive information about your WordPress installation, while the .htaccess file can be used to override server configurations. Protecting these files is crucial for your WordPress site's security.
Step 1: To protect the wp-config.php file, add the following code to your .htaccess file:
<files wp-config.php>
    order allow,deny
    deny from all
</files>
Step 2: To protect the .htaccess file itself, add the following code to the .htaccess file:
<files .htaccess>
    order allow,deny
    deny from all
</files>
Both codes tell the server to deny access to these files.
Remember: Keep backups and be very careful when editing these files as mistakes can break your website.
Regularly Monitor Your Site's Activity
Keeping an eye on what's happening on your website can help you identify any suspicious activities early. WordPress activity log plugins can help you with this.
Step 1: Install an activity log plugin such as 'WP Security Audit Log' or 'Activity Log'.
Step 2: Configure the plugin according to your requirements. These plugins usually log activities like login attempts, content edits, and changes in settings.
Step 3: Regularly check your activity logs. If you notice anything unusual, investigate it further to ensure it's not a security threat.
Use a VPN
A VPN (Virtual Private Network) encrypts your internet connection and hides your IP address, which can protect your login details from being intercepted.
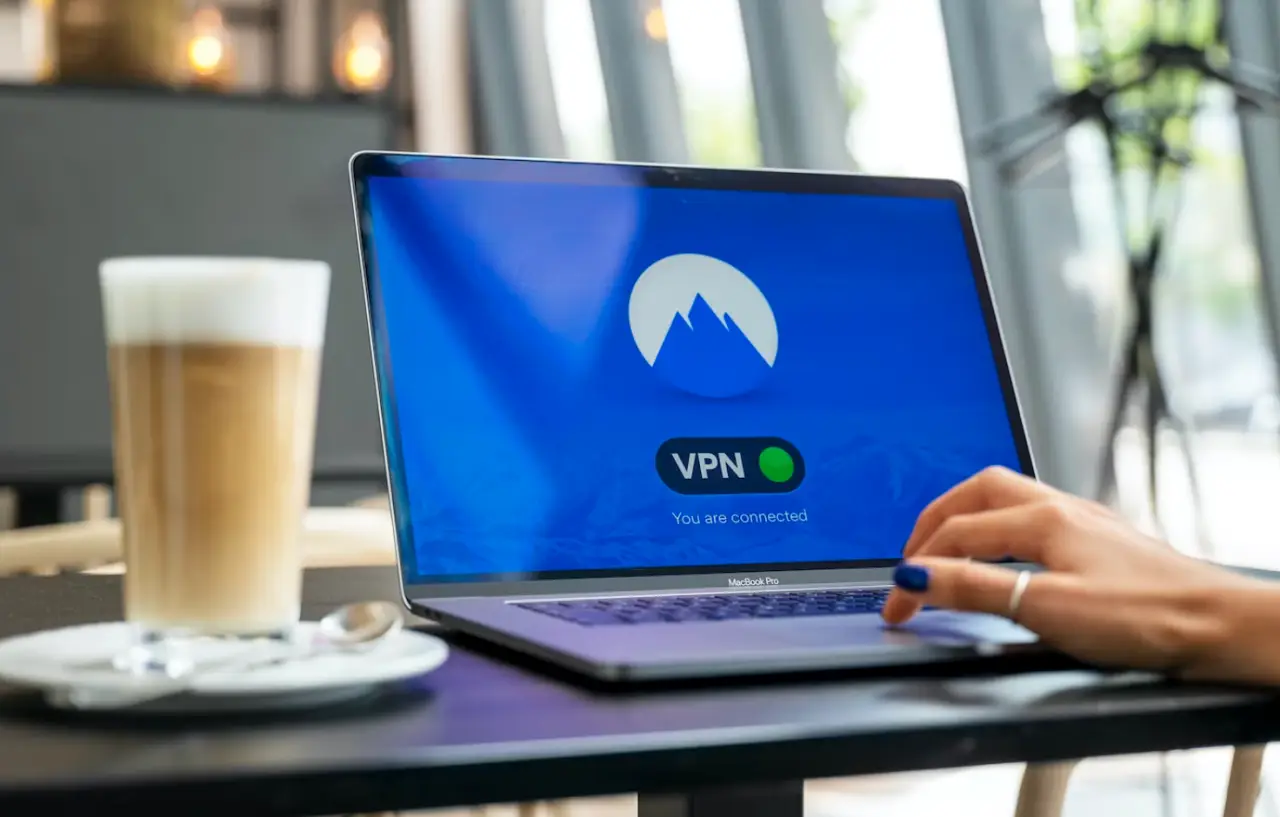
Step 1: Choose a reliable VPN provider. There are many options available, both free and paid.
Step 2: Install the VPN software on your device(s).
Step 3: Ensure the VPN is connected whenever you're working on your WordPress site.
Protect Your Computer
Keeping your own computer secure is also important. If your computer gets infected with malware, your own login credentials and details could be compromised.

Step 1: Install a reliable antivirus software.
Step 2: Regularly scan your computer for malware.
Step 3: Always update your computer's operating system and software when updates become available.
Restrict Access to WP-Admin Directory
You can add another layer of security to your site by password-protecting the wp-admin directory.

Step 1: Access your website through your hosting provider's control panel.
Step 2: Navigate to the 'Security' section and look for 'Password Protect Directories' or a similar option.
Step 3: Navigate to the wp-admin directory and create a new user for it.
Step 4: Save the changes. Now, accessing the wp-admin directory will require this additional username and password.
Use a Content Delivery Network (CDN)
A CDN not only makes your website load faster for users around the globe, but it also protects your site against DDoS attacks.

Step 1: Choose a CDN provider, such as Cloudflare or StackPath.
Step 2: Follow the provider's instructions to set up the CDN. This will usually involve changing some DNS settings.
Conclusion
Changing your admin password in WordPress should be part of your regular maintenance and security practice.
Remember, always use strong, unique passwords and change them regularly to ensure your website's safety.
Your WordPress admin password is your first line of defense against unauthorized access, and changing it regularly should be a part of your regular site maintenance.
Always ensure to use a strong, unique password and keep your WordPress site, plugins, and themes up-to-date.
We hope this guide has been helpful. Keep your WordPress site secure!
Comments