Mastering the WP Admin Panel: Your Comprehensive Guide To WordPress Administration
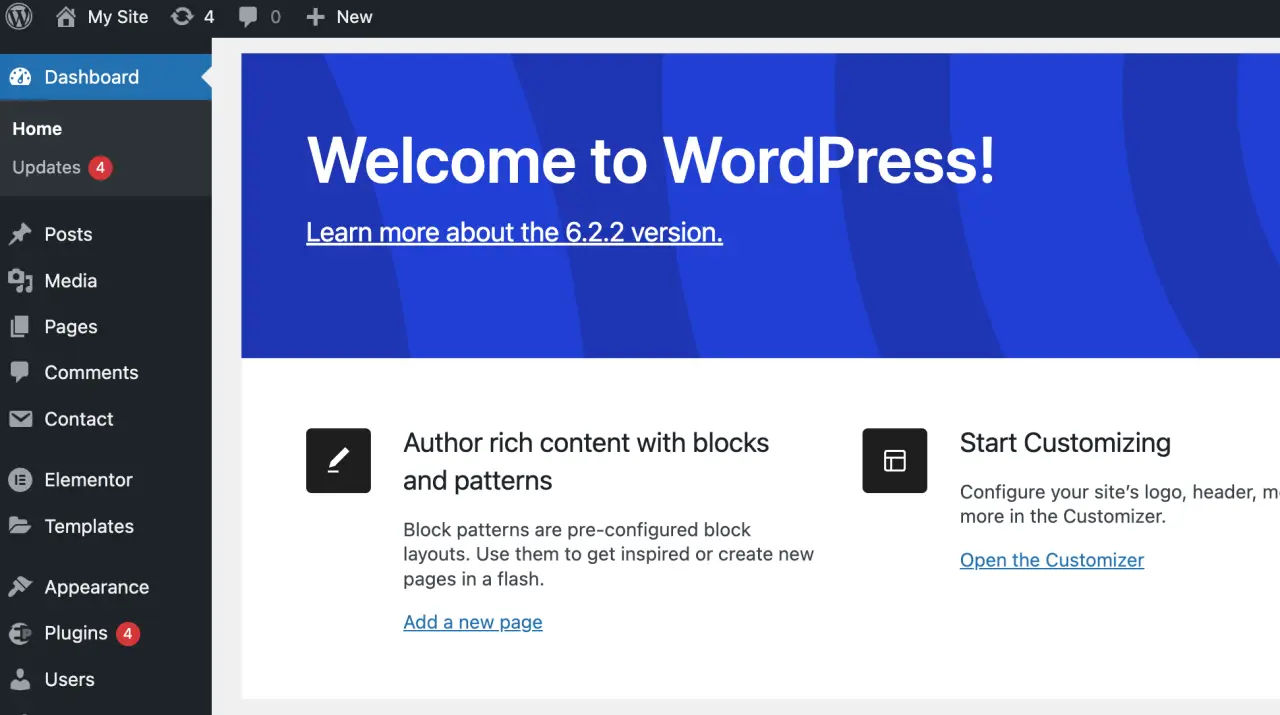
WordPress, known for its user-friendly interface and extensive customization capabilities, has become the platform of choice for millions of website owners worldwide.
One of the essential elements to understand when operating a WordPress website is the WordPress dashboard, also referred to as the WP admin dashboard or WordPress admin dashboard page.
This comprehensive guide is designed to enlighten both new and experienced users about the functionality and power encapsulated in the WordPress dashboard.
From the first step of accessing the WordPress admin login page to navigating through the multitude of management options in the WordPress back office administration screen, we will explore all facets of WordPress administration.
We'll cover creating and managing posts and pages, managing your site's appearance, handling user accounts, and much more.
This post will also answer some frequently asked questions and provide tips for optimizing your experience within the WordPress control panel.
Whether you're just starting out with your first WordPress site or looking to deepen your understanding of the WordPress admin dashboard, this guide is for you.
Let's dive in and unravel the secrets of the WordPress admin dashboard, your central hub for site management and customization.
TABLE OF CONTENTS
- Understanding the WordPress Admin Area
- Locating the WordPress Admin
- Logging in to the WordPress Dashboard
- How to Create and Manage Posts and Pages
- How to manage plugins and tools
- Can You Change How The WordPress Admin Panels Looks And Functions?
- Managing How Your WordPress Site Looks With The WordPress Admin Area
- How to manage WordPress comments
- How to manage user accounts in WordPress
- WordPress Media Settings
- FAQs
- Conclusion
Understanding the WordPress Admin Area
The WordPress admin area, or the WordPress admin dashboard, is where all the behind-the-scenes action happens. It's your command center, your back office - it's where you shape your website's user experience.
Upon logging in through the WordPress admin page, you'll find a WordPress dashboard filled with menus and sub-menus, each representing different aspects of your website.
Your WordPress Admin Dashboard
This is the first screen you see when you log in to your WordPress admin page.
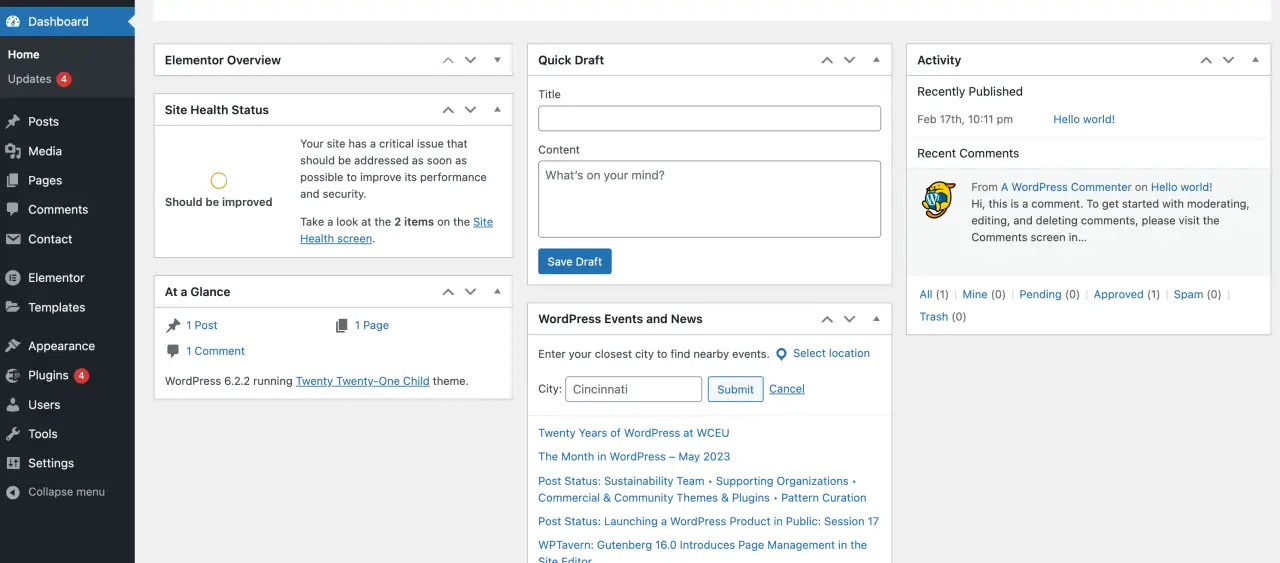
It provides a general overview of your site, with widgets displaying snippets for specific users of information such as recent activity, quick draft, WordPress news, and more.
By using this WordPress admin dashboard effectively, you can get a quick understanding of how your site is performing.
Navigating the WordPress Admin Dashboard
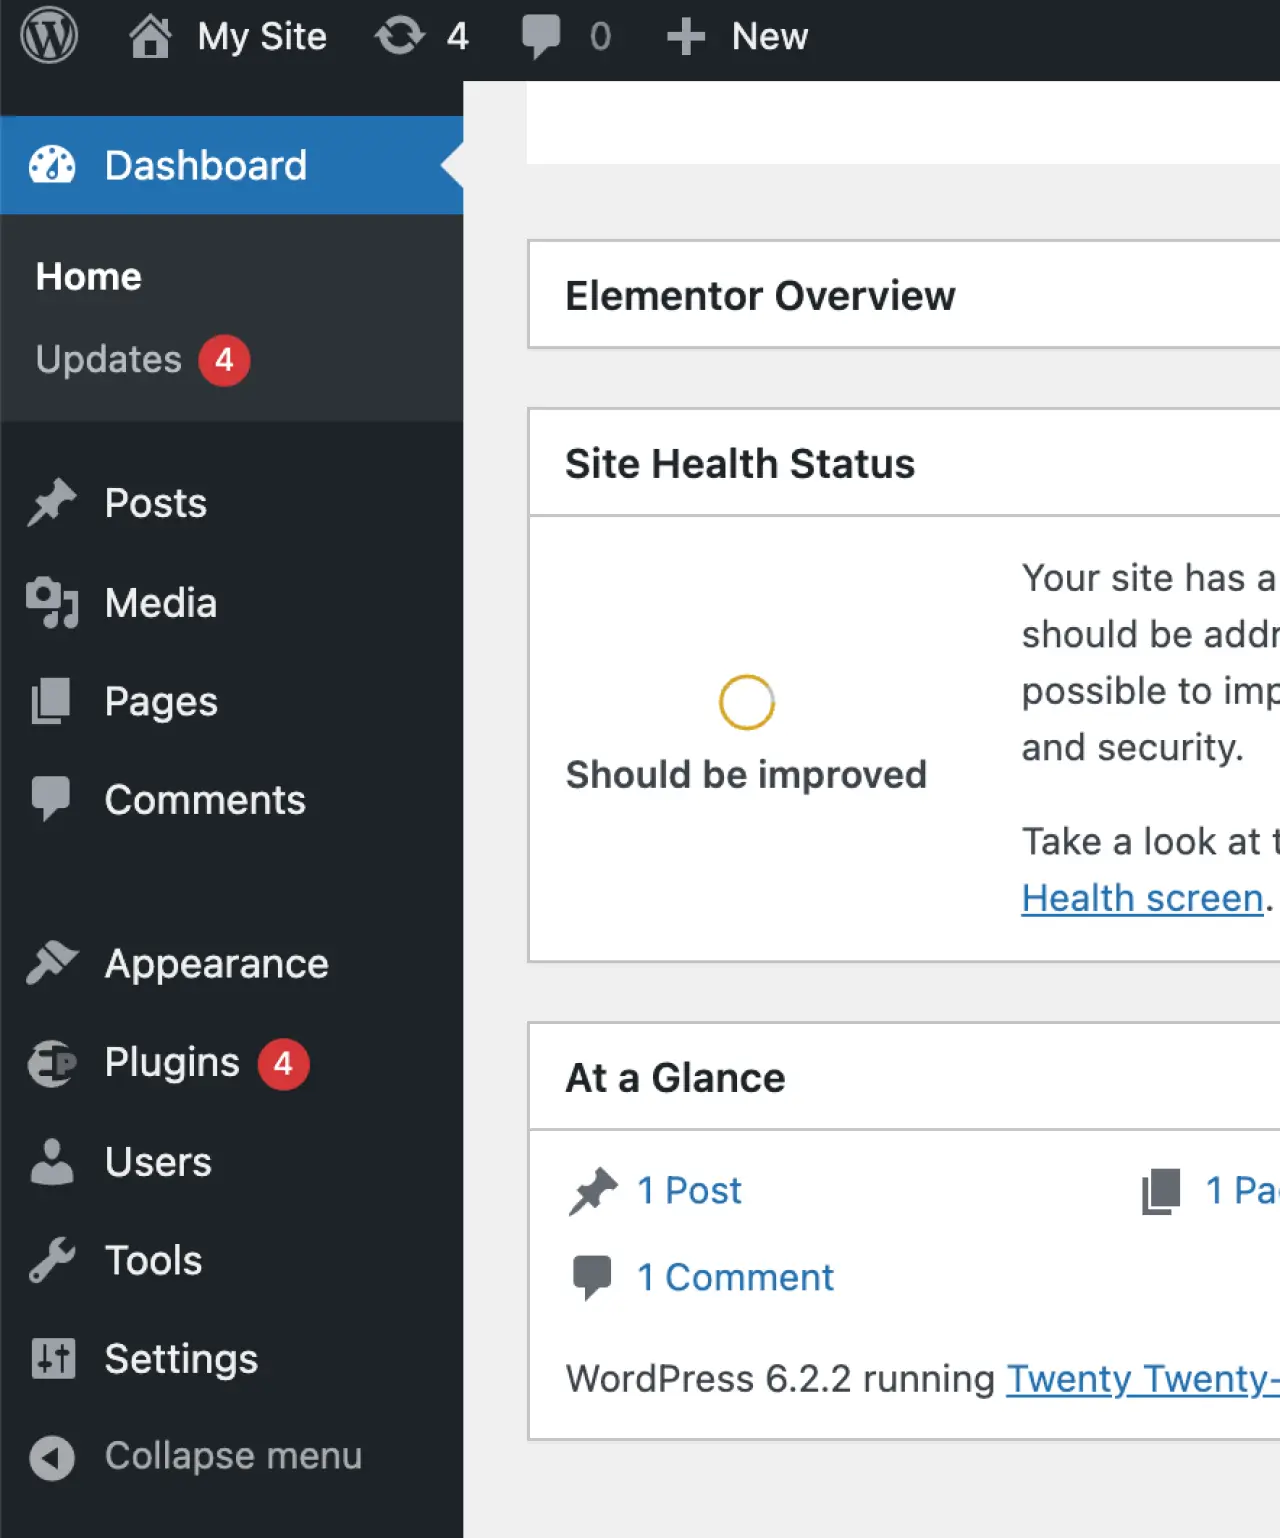
WordPress's admin panel is a multifaceted tool. Here are the key areas that you will interact with:
-
Posts: This is where you manage your blog posts - create, edit, categorize, or delete posts.
-
Media: Manage all media files, including images, videos, audio, and documents.
-
Pages: Similar to posts, this is where you create and manage static pages such as 'About Us', 'Contact Us', etc.
-
Comments: This is where you manage and moderate comments left by your WordPress website visitors.
-
Appearance: Customize your website's look and feel using themes, customize your site, manage widgets and menus, and even edit your website’s CSS.
-
Plugins: Plugins add additional functionality to your website. Install, activate, deactivate, or delete plugins from here.
-
Users: Manage users, roles, and permissions. This is where you can add new users or change existing user roles.
-
Settings: Adjust your website's global settings, including your WordPress website's title, tagline, URL, and comment settings.
Leveraging the WordPress Admin Dashboard
The WordPress control panel is your toolbox. But like any toolbox, it's not enough to simply have it; you need to know how to use it.
By familiarizing yourself with the WordPress dmin panel, you can perform tasks more efficiently, streamline your workflow, and build a better WordPress website.
Locating the WordPress Admin
You can locate your WordPress Admin dashboard by adding admin area "/wp-admin" or WordPress admin login page "/wp-login.php" to the end of your login URL. Here's what it looks like:
- If your WordPress website URL is "www.example.com" then your WordPress Admin URL will be "www.example.com/wp-admin" or "www.example.com/wp-login.php".
Simply type this default login URL back into your web browser, and you will be taken directly to the front page of your WordPress Admin login page.
Alternatively, if you have installed WordPress in a subdirectory, for example, "blog", the WordPress admin login page would then be found at "www.example.com/blog/wp-admin" login URL.
If your website has been installed on a subdomain, the WordPress Admin login URL will look like this: "subdomain.example.com/wp-admin".
Logging in to the WordPress Dashboard
Once you are on the WordPress login screen, you will see two main fields:
-
Username or Email Address: This is where you will enter your username or the email address associated with your WordPress account.
-
Password: Here, you will enter the password you created when setting up your WordPress account.
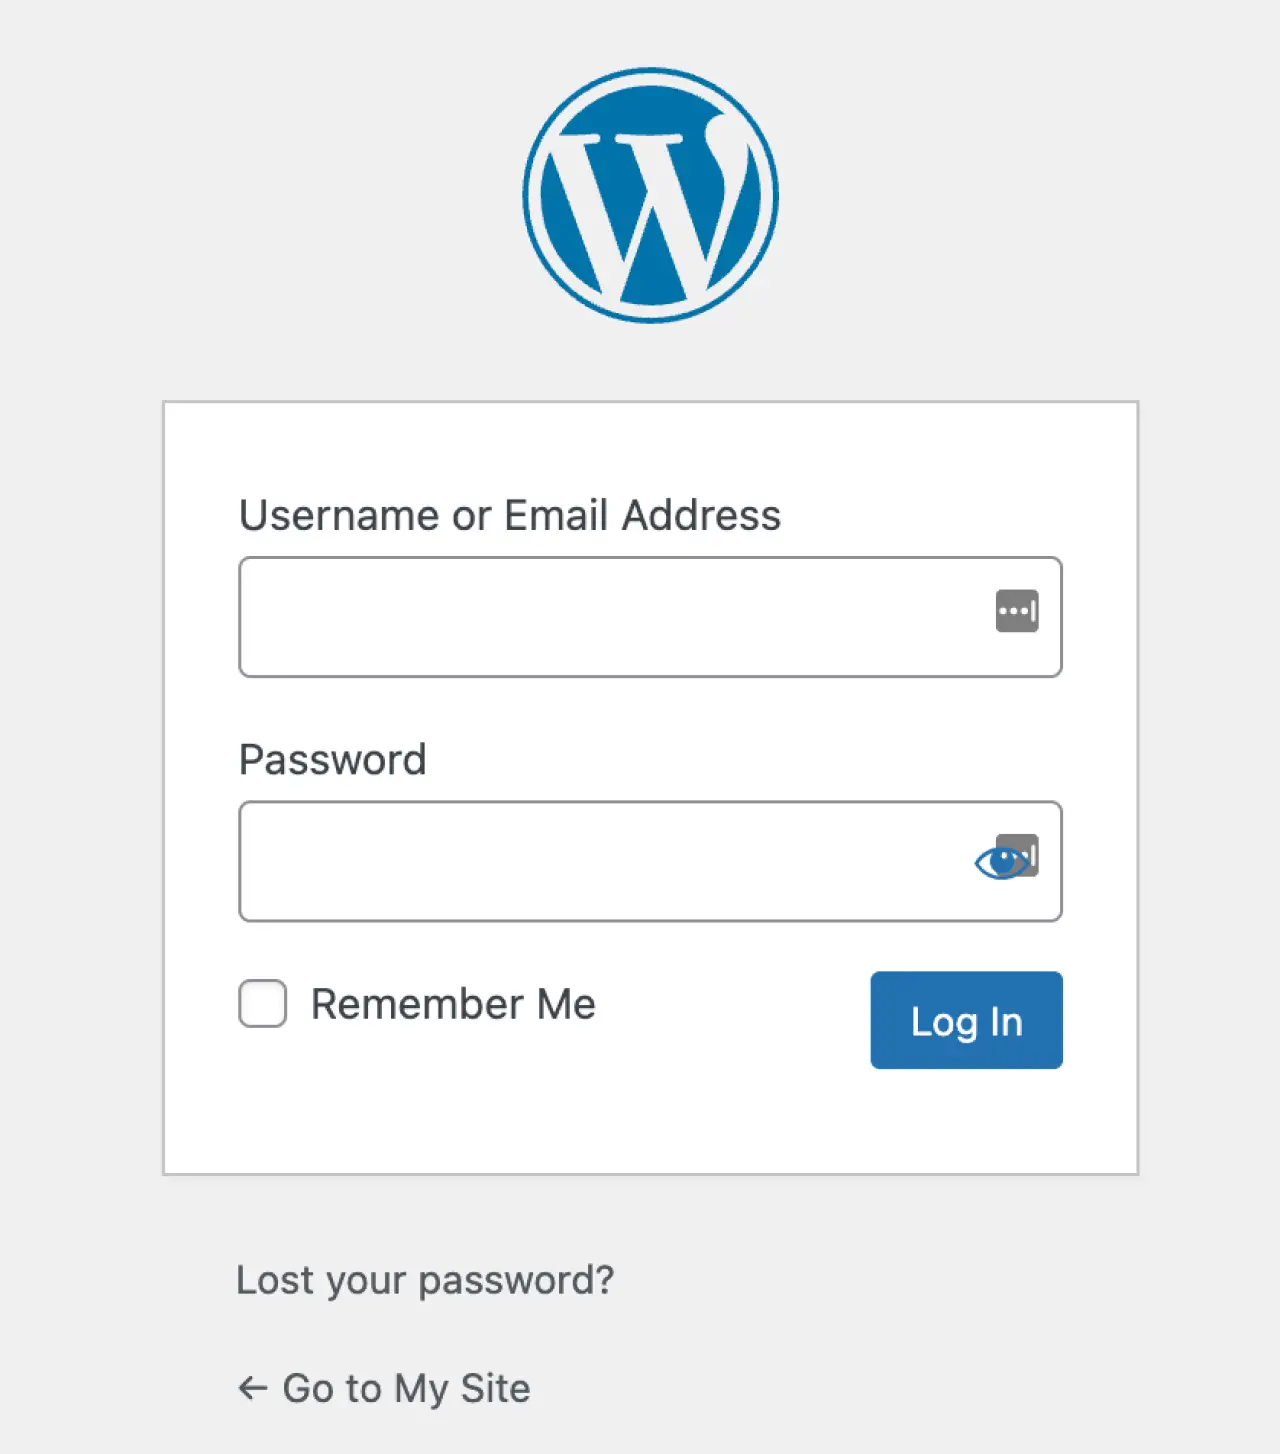
After entering your username (or email) and password, click the "Log In" button. If your credentials are correct, you will be redirected to your WordPress Admin Dashboard, which serves as your control panel for your WordPress site.
What if You have Forgotten Your Password?
In case you have forgotten your password, there's an option labeled "Lost your password?" on the login screen. Clicking this will lead you through the process of resetting your password via your registered email address.
Your WordPress admin page is the gateway to your website's back office, the central hub from where you control all aspects of your site.
It is always important to keep your login credentials secure and regularly update your password to help maintain your website's security.
By understanding how to locate and log into your WordPress admin page, you're well on your way to making the most of WordPress's powerful administration tools.
Whether you're managing content, installing plugins, or customizing your WordPress website's appearance, it all starts with logging into your WordPress Admin Panel.
How to Create and Manage Posts and Pages
Creating and managing pages and posts are fundamental operations in WordPress administration. Whether you're adding new blog content or building static pages, the WordPress Admin Panel provides user-friendly tools to make the process straightforward. Here's how you can create and manage your pages and posts on your WordPress site:
Creating a New Post
Posts are the entries that make up a blog on a WordPress site. They're typically organized in reverse chronological order. Here's how you can create a new post with classic or block editor (set the editor type in Settings > Writing):
-
Log in to your WordPress Admin Area: Enter your WordPress admin page by appending "/wp-admin" to your WordPress website URL. Log in using your credentials.
-
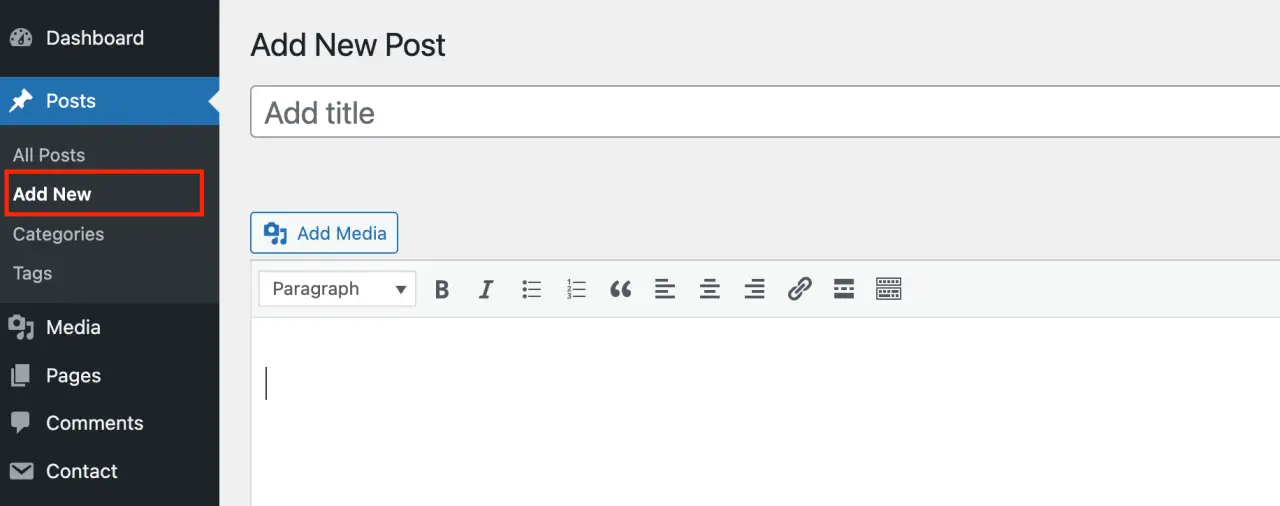
Go to 'Posts': In the WordPress admin dashboard, find and click on 'Posts' in the left-hand side menu.
-
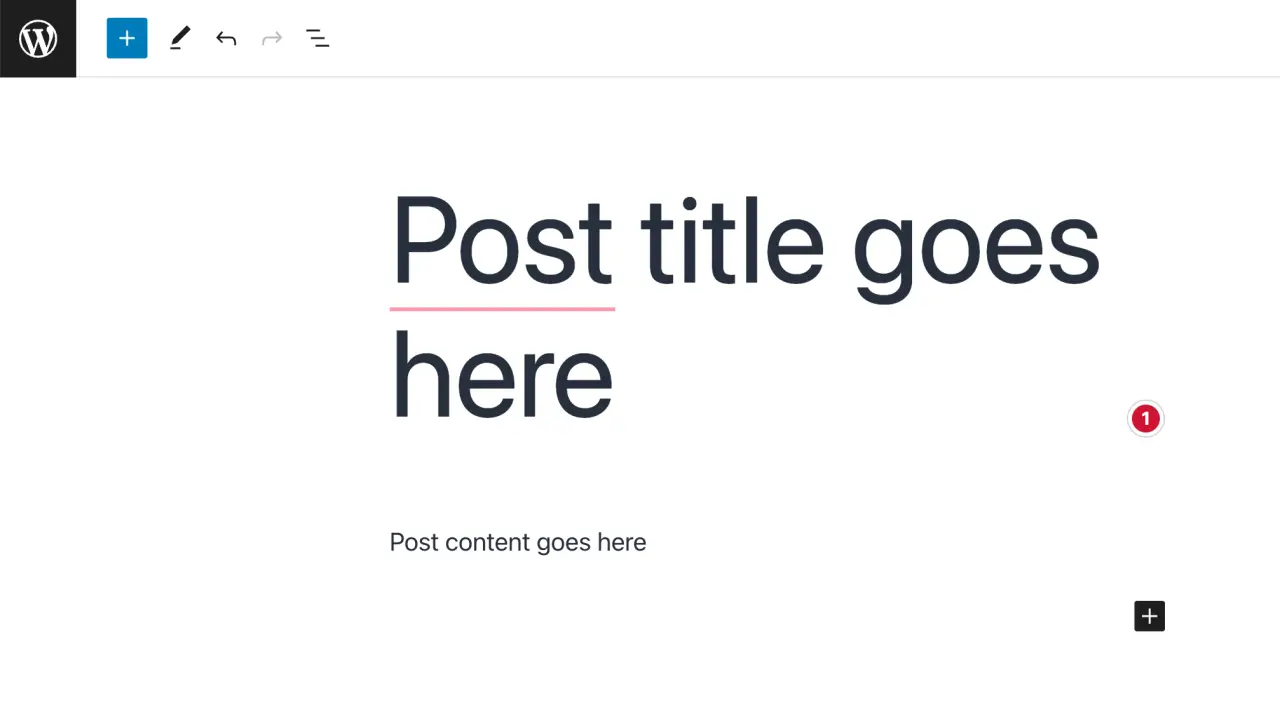
Click 'Add New': This will take you to the 'Add New Post' screen, which is an editor where you can create your new blog post.
-
Enter the Post Details: Write your post title in the top bar and your post content in the large text area below it. You can use the WordPress Block Editor to add and format your content, insert images, embed videos, and more.
-
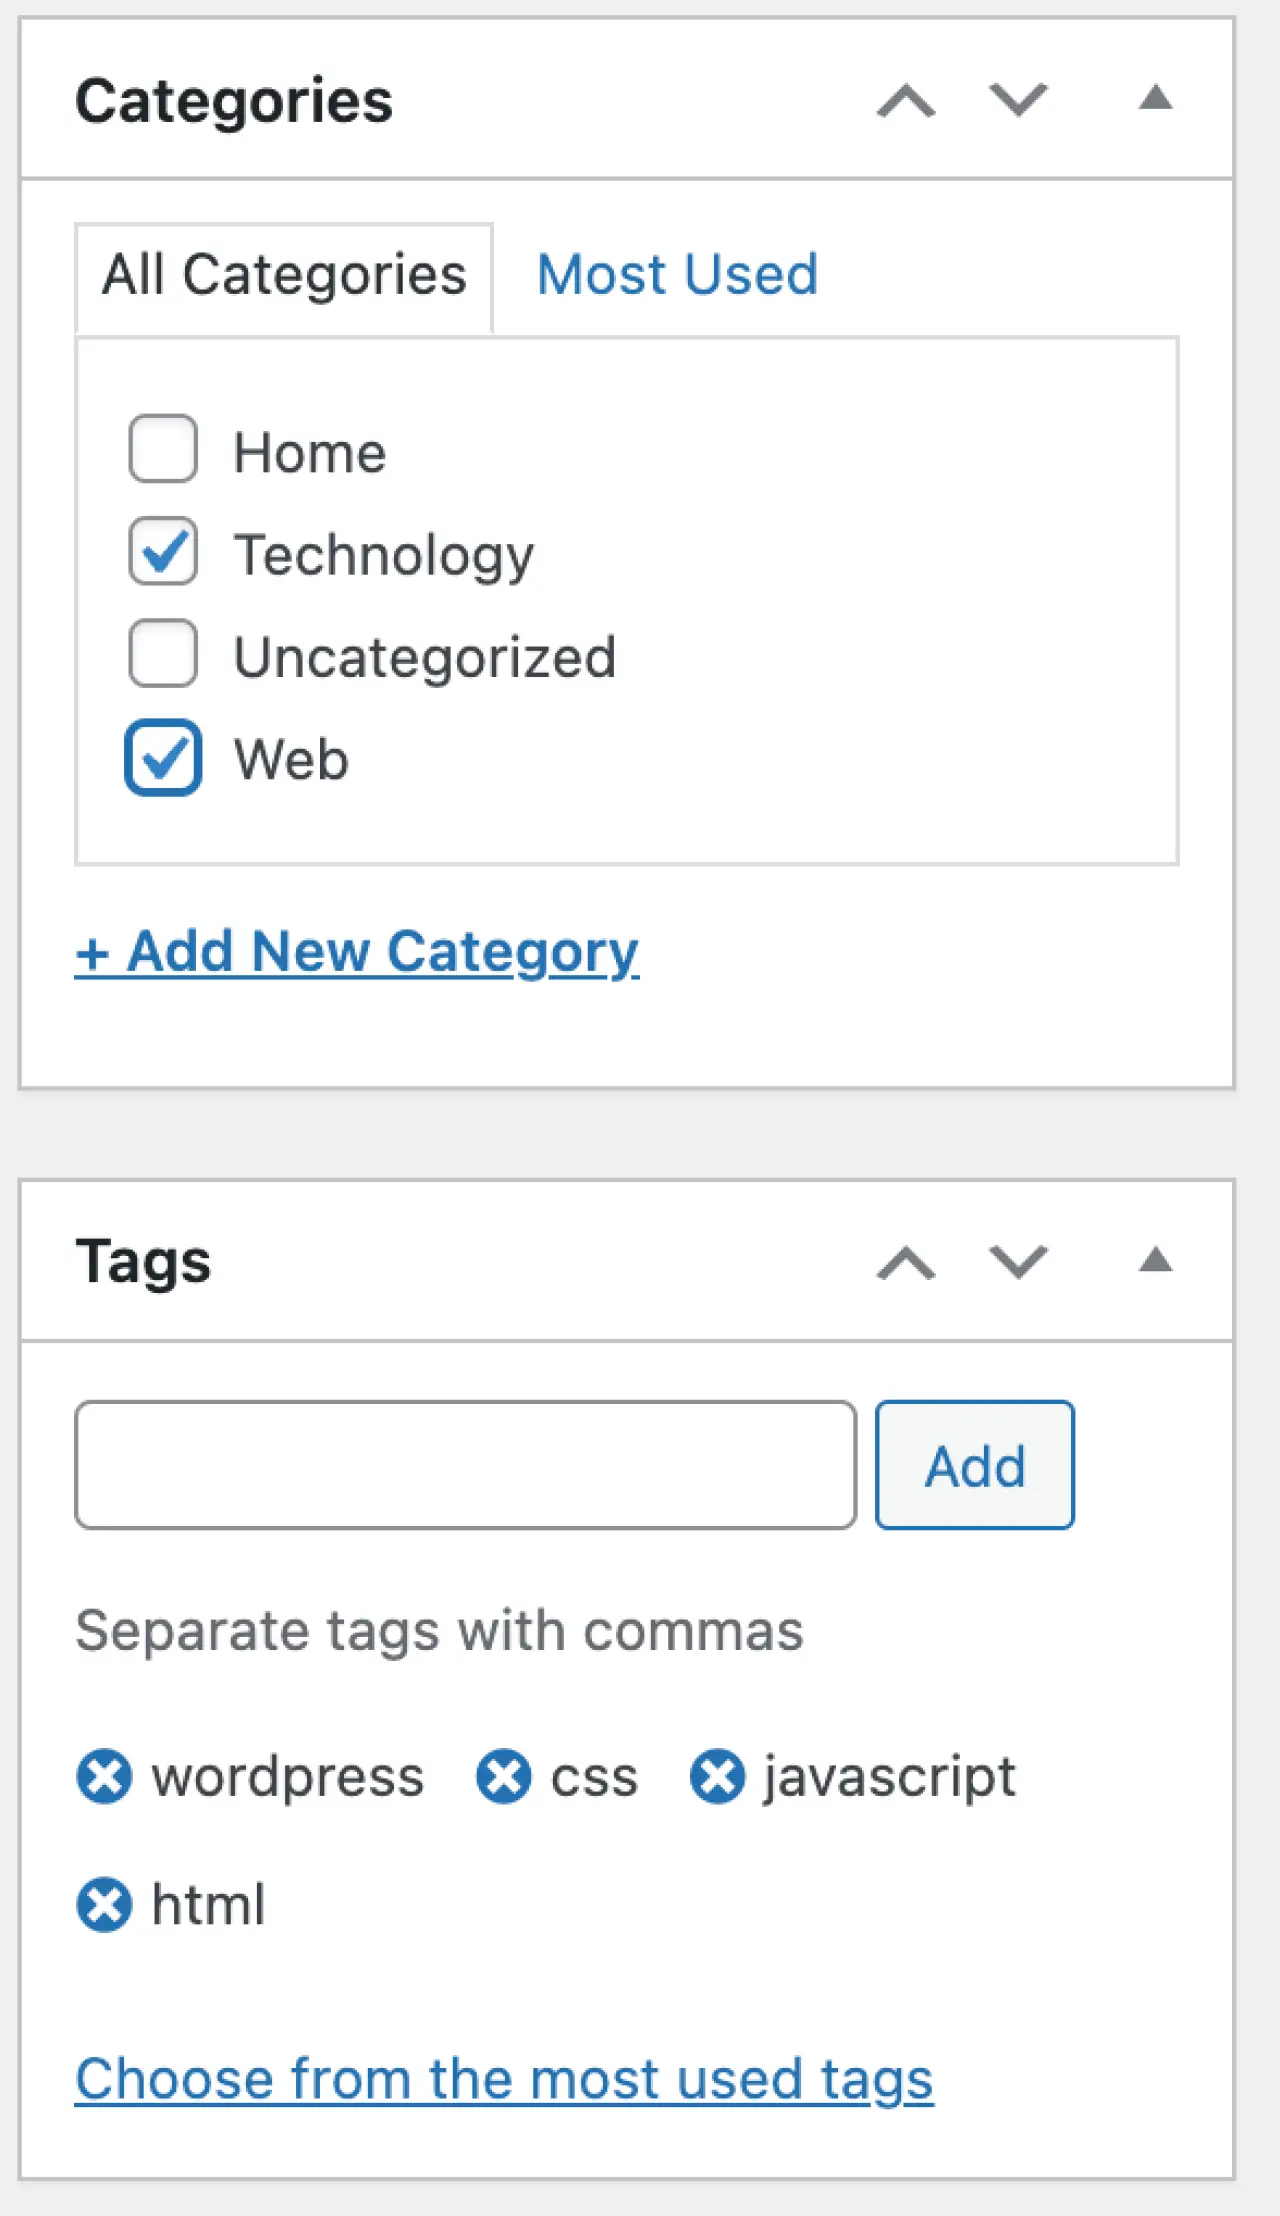
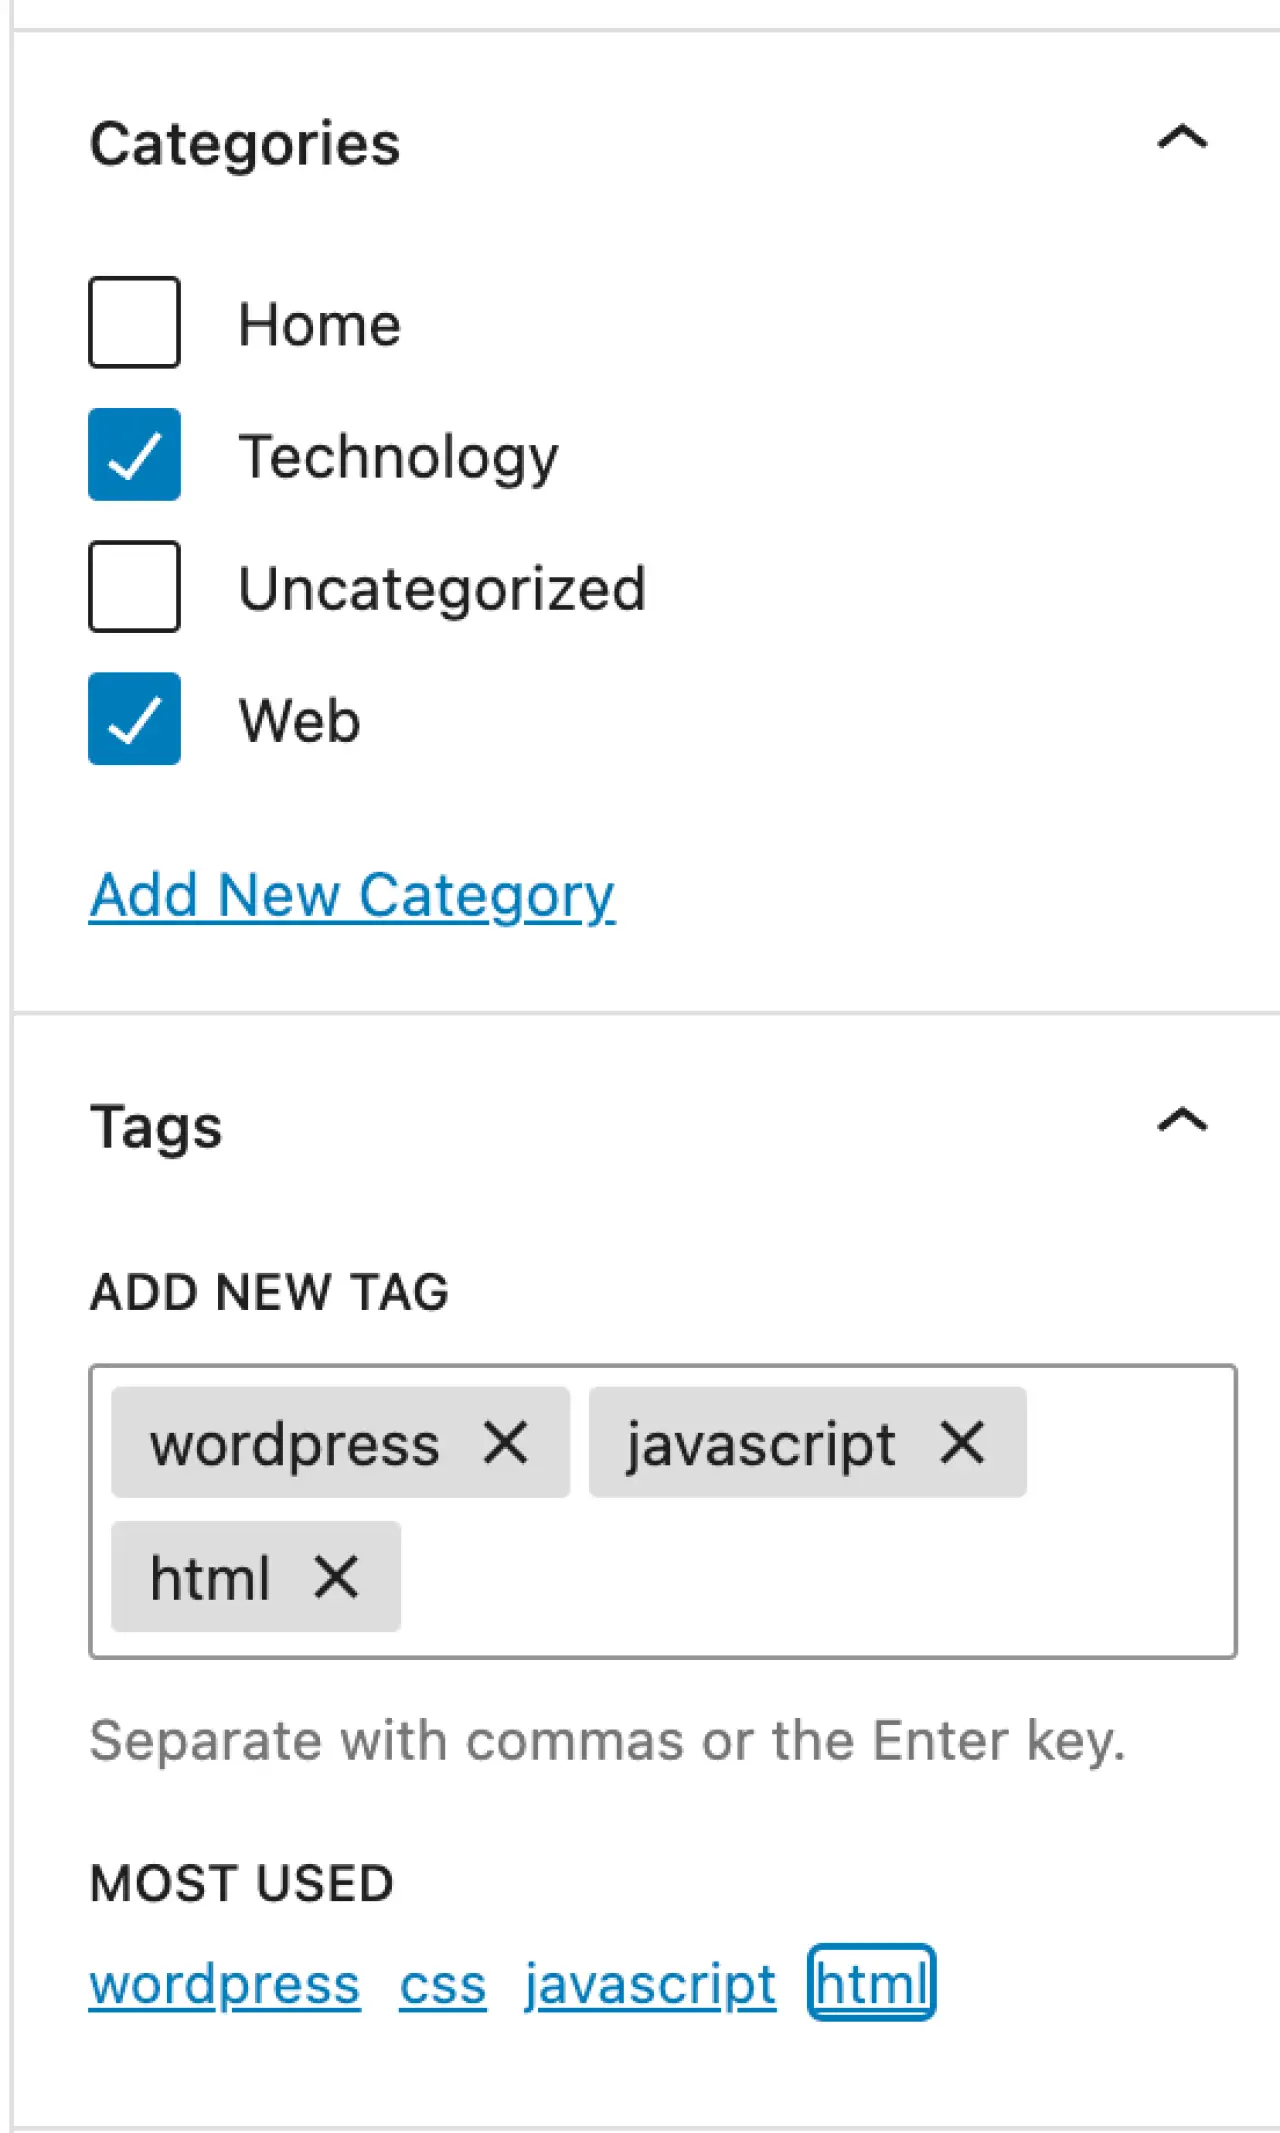
Set Categories and Tags: To the right of your editor, you can assign your post to specific categories and tags. Categories and tags help organize your content and make it easier for visitors to find what they're looking for.
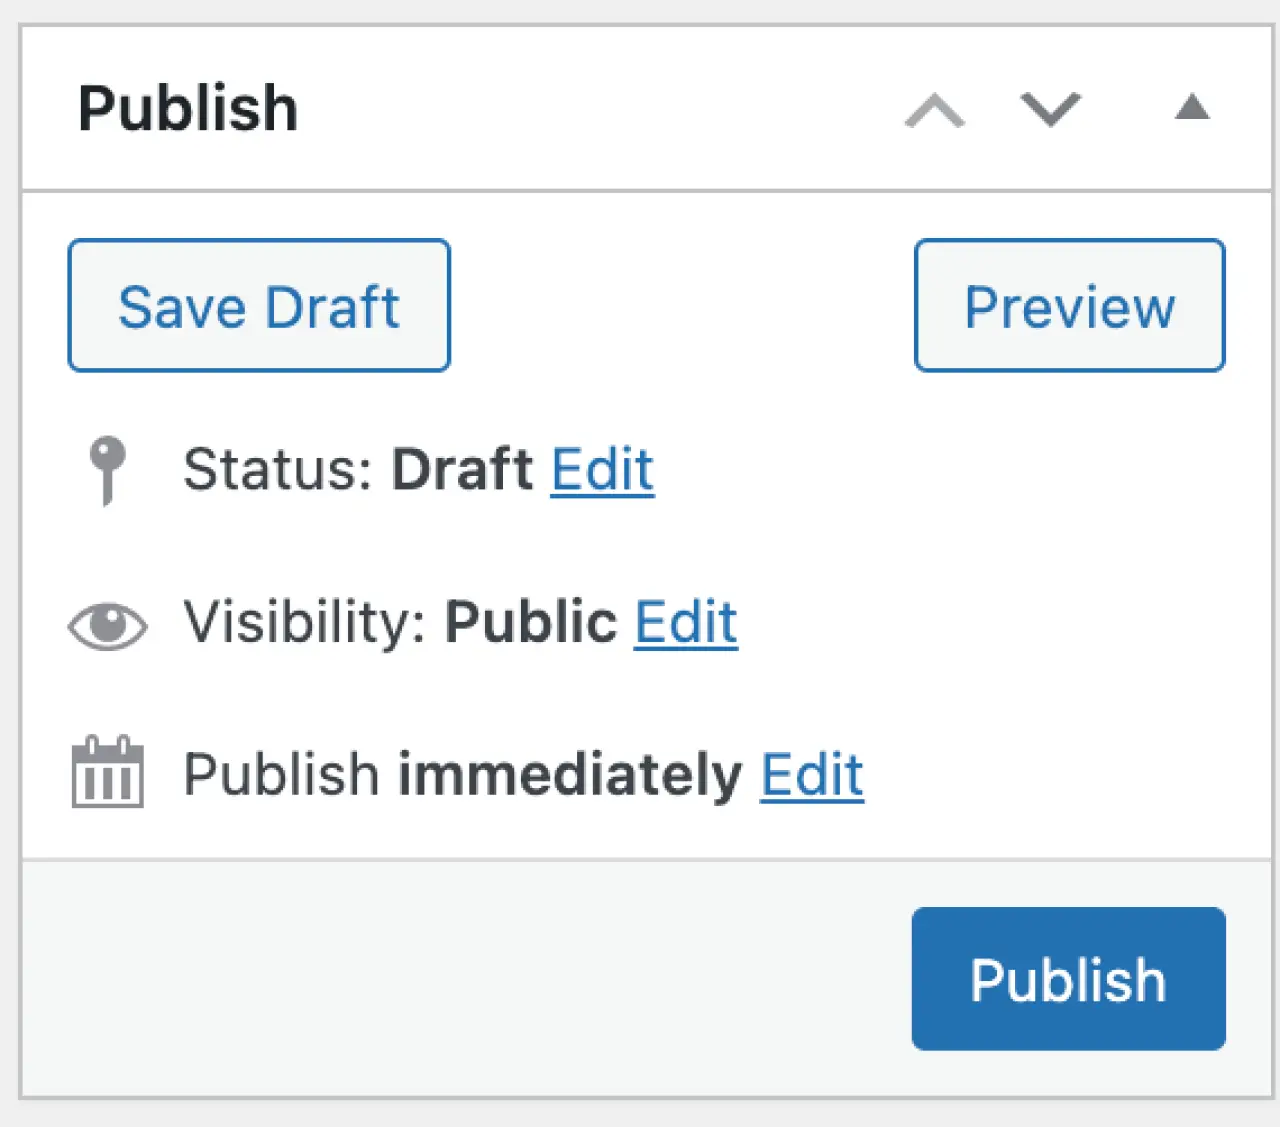
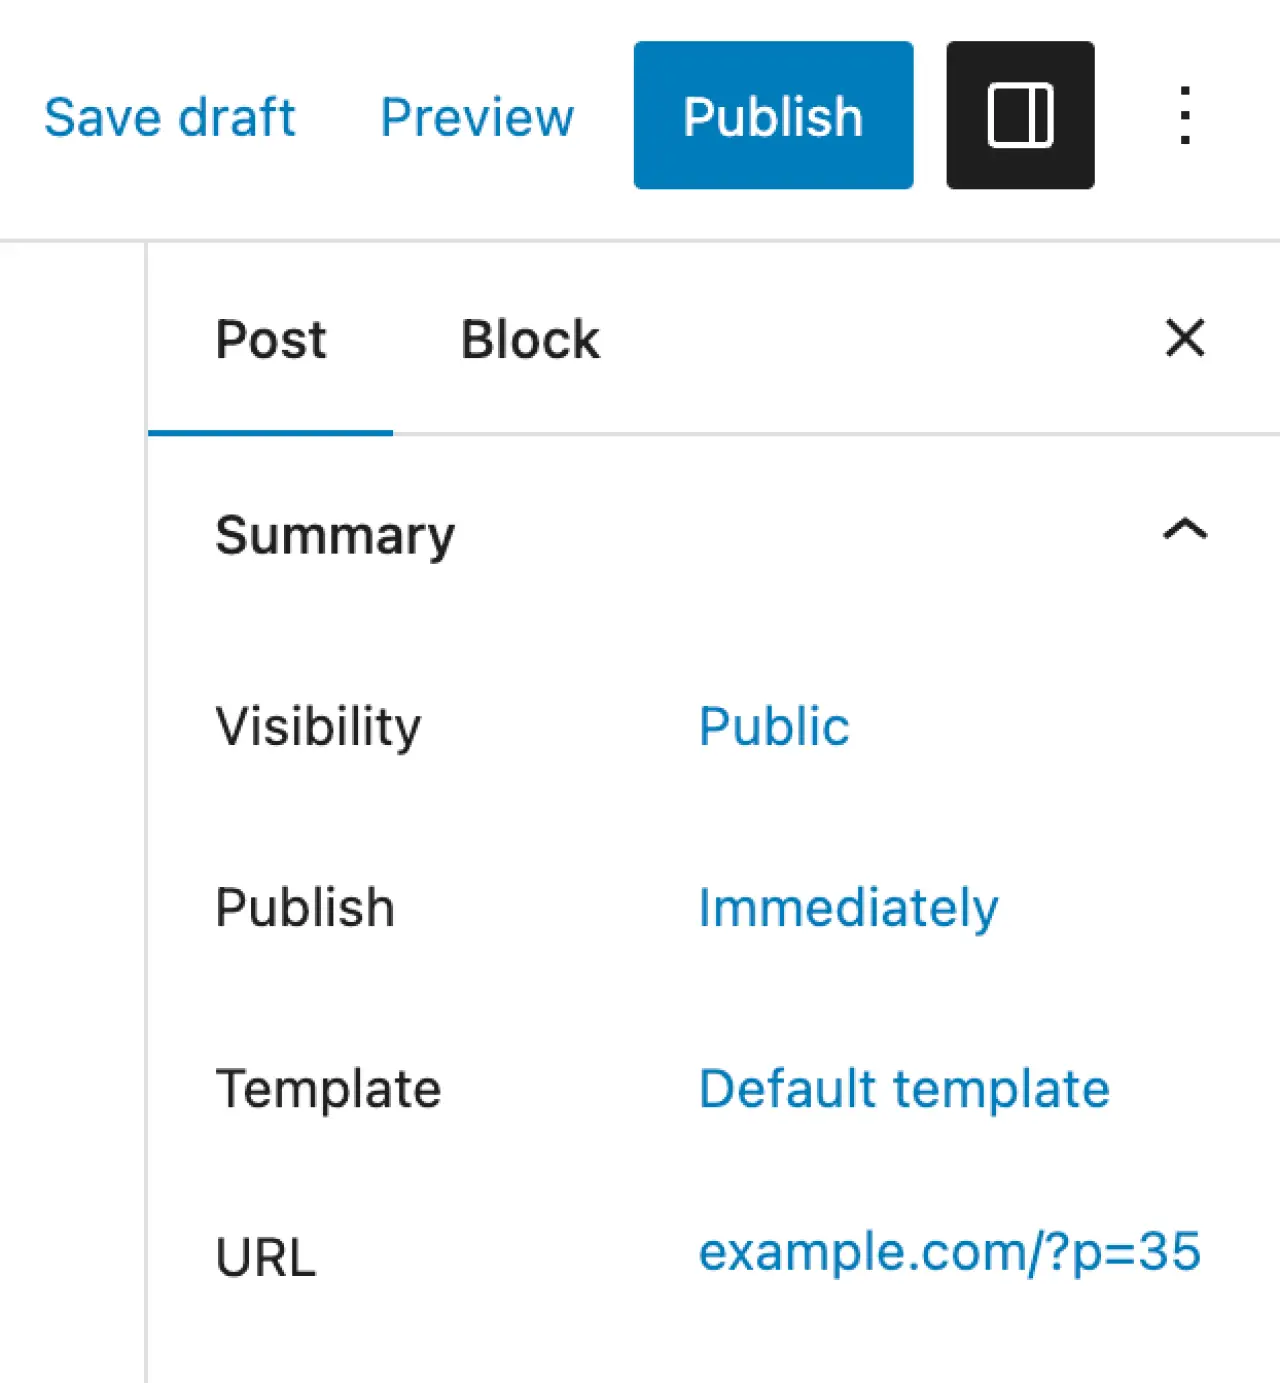
- Publish or Save Draft: Once you're satisfied with your post, click the 'Publish' button on the top right to make your post public. If your post isn't ready yet, click 'Save Draft' to save your progress and come back to it later.
Creating a New Page
Pages in WordPress are static content that exists outside of the chronological blog structure. These often include 'About Us', 'Contact Us', 'Services' pages, and more. Here's how you can create a new page:
-
Log in to your WordPress Admin Area.
-
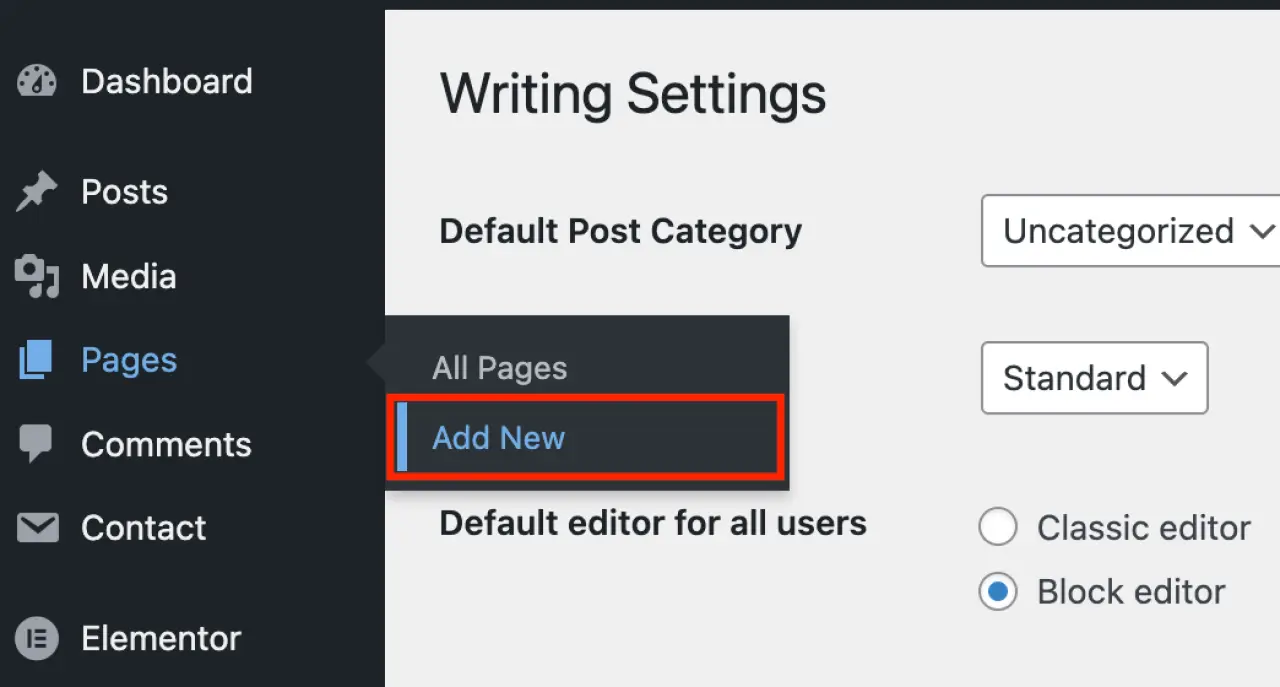
Go to 'Pages': In the WordPress dashboard, find and click on 'Pages' in the left-hand side menu.
-
Click 'Add New': This will take you to the 'Add New Page' screen.
-
Enter the Page Details: Similar to a new post, enter your page title at the top and your content in the large text area below it.
-
Publish or Save Draft: When you're happy with your page, click the 'Publish' button to make it live. If you want to save it for later, click 'Save Draft'.
Managing Posts and Pages for Your WordPress Website
WordPress also makes it easy to manage, edit, add links to, or delete your existing posts and pages.
To manage your posts, go to your WordPress admin area and click on 'Posts'. You'll see a list of all your posts. Hover over a post title to see the options to move posts option 'Edit', 'Quick Edit', 'Trash', or 'View'.
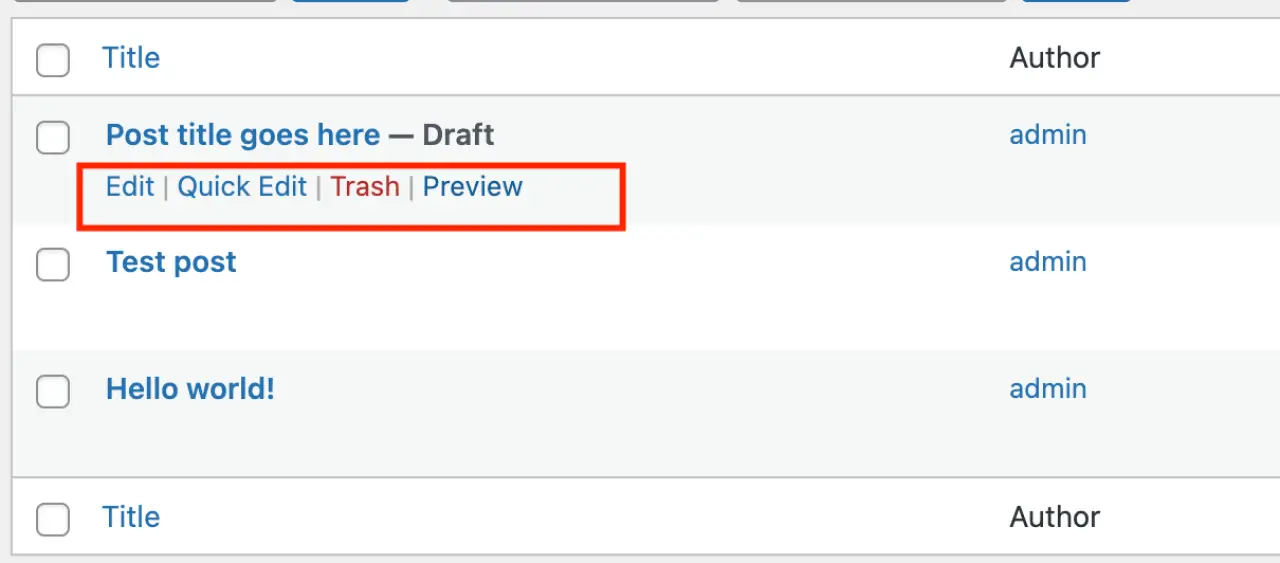
To manage your pages, the process is similar. Go to 'Pages' in your WordPress dashboard. Hover over a page title to see the options to 'Edit', 'Quick Edit', 'Trash', or 'View'.
Whether you're creating a new blog post or a static page, WordPress provides an intuitive and powerful platform for you to create and manage your content.
Remember, content is king, so utilize these tools to deliver valuable and engaging content to your audience.
How to manage plugins and tools
Managing plugins and tools in WordPress is key to maintaining your site's functionality and performance. Here's how you can do it from your WordPress dashboard:
Installing Plugins
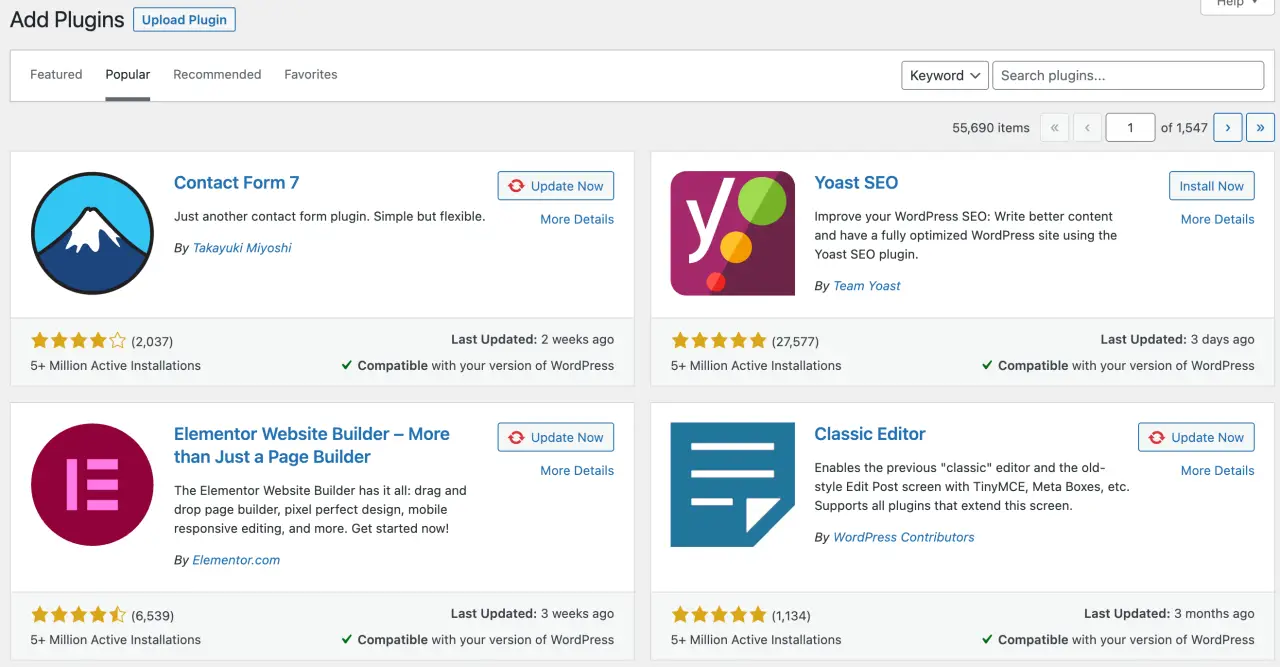
To add new functionalities to your site, you might want to install new plugins first. Here's how:
-
Go to 'Plugins' > 'Add New'.
-
Use the search field to find a specific plugin, or use the 'Featured', 'Popular', 'Recommended', or 'Favorites' tabs to browse available plugins.
-
Once you've found a plugin you want to use, click 'Install Now'.
-
After installation, click 'Activate' to start using the plugin.
Managing Installed Plugins
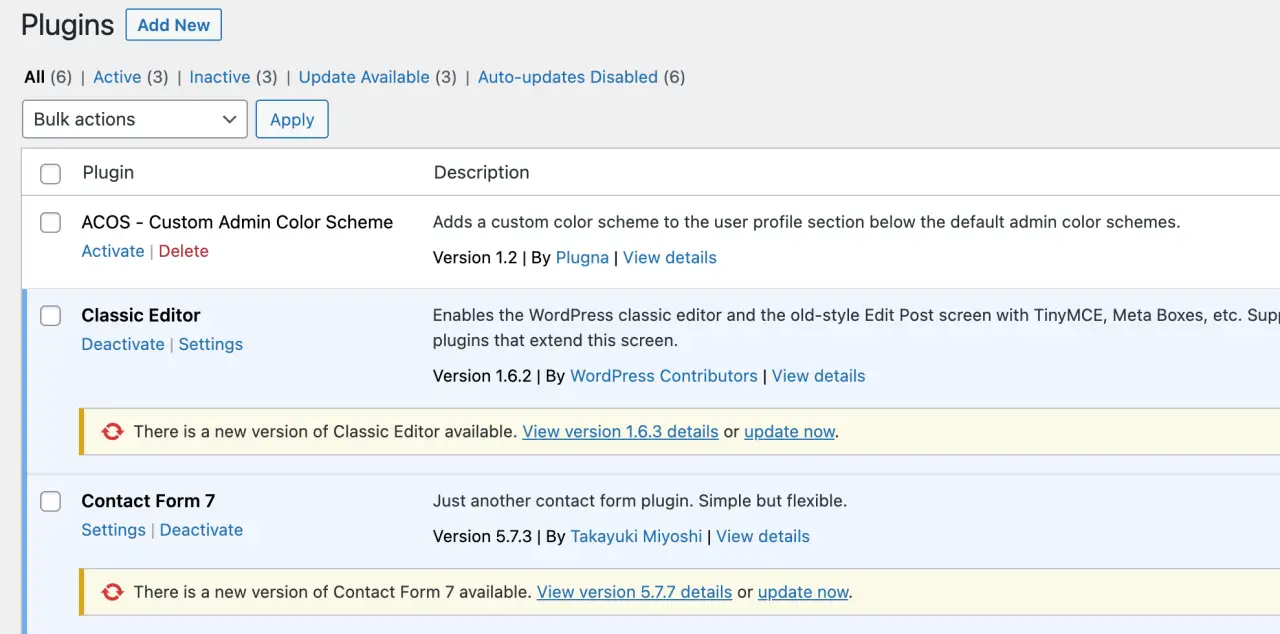
You can manage all your installed plugins from 'Plugins' > 'Installed Plugins'. Each plugin in the list has options to 'Activate', 'Deactivate', or 'Delete'.
-
Activate: Turns on the plugin so it's functional on your site.
-
Deactivate: Turns off the plugin. The plugin's files remain on your server, but it does not affect your site's functionality.
-
Delete: Removes the plugin's files from your server. You should always deactivate a plugin before deleting it.
In the 'Installed Plugins' section, you can also use 'Bulk Actions' to activate, deactivate, or delete multiple plugins at once.
Updating Plugins
Regularly updating your plugins is crucial for security and functionality. If a plugin update is available, you'll see a notification in your 'Plugins' menu.
-
To update a plugin, go to 'Plugins' > 'Installed Plugins'.
-
Find the plugin with an available update and click 'update now'.

Using Tools
WordPress comes with several built-in tools found under the 'Tools' menu:
-
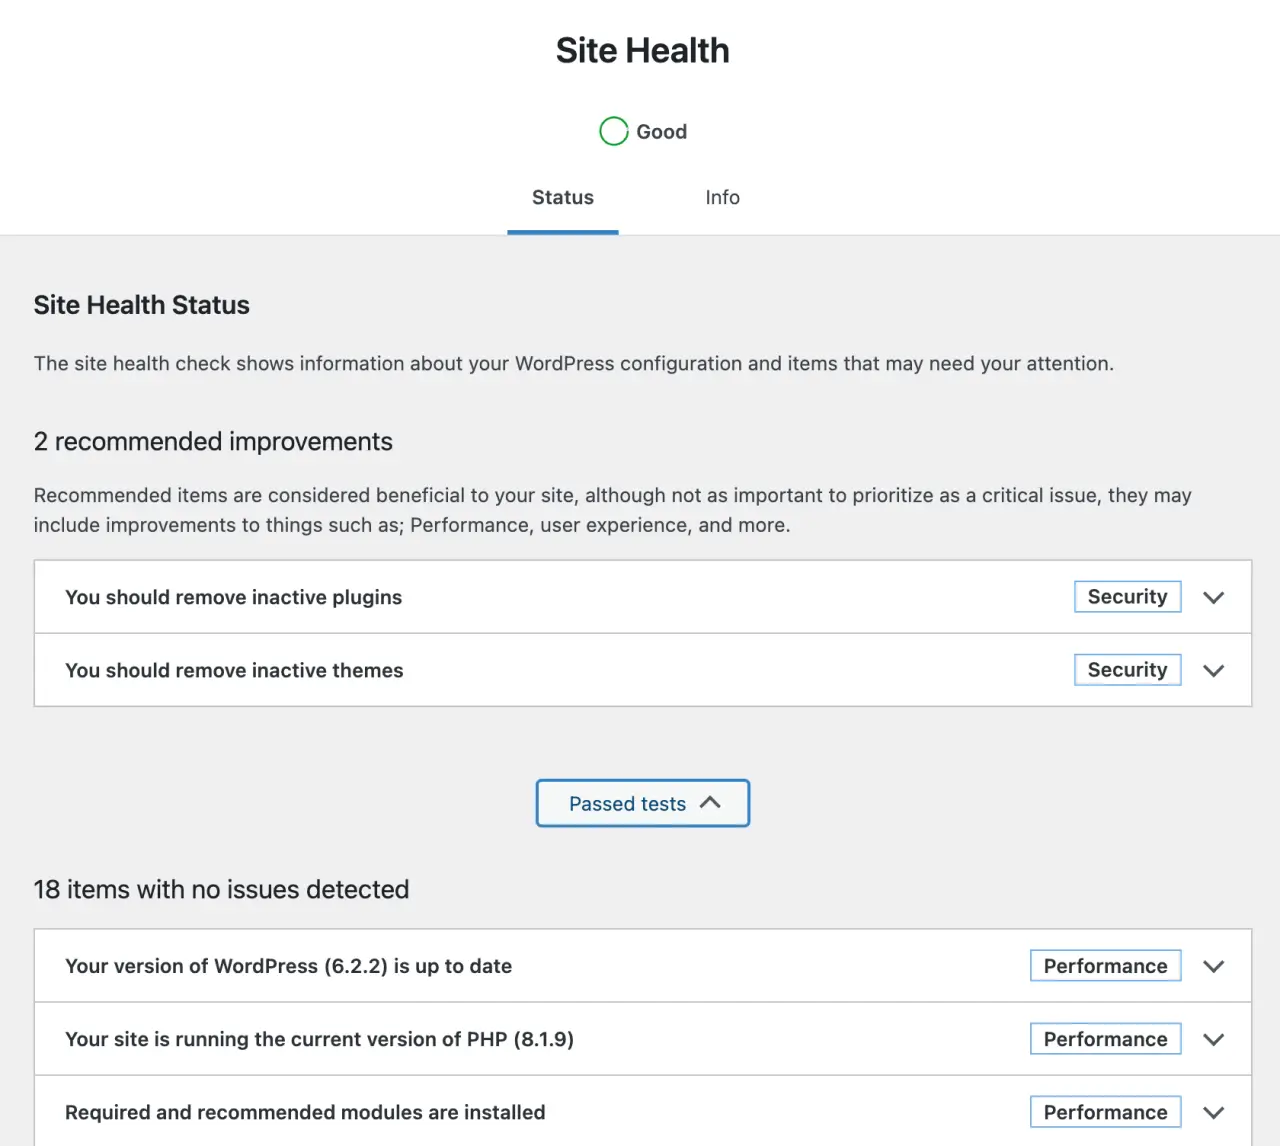
Site Health: This tool checks your site for any performance or security issues and provides recommendations for improvement.
-
Export: This allows you to export all your site's content, or content of a particular type, which you can then import into another WordPress site.
-
Import: This tool lets you import content from another WordPress site or from other platforms like Blogger or Tumblr.
-
Erasure requests: If you have user data requests, you can manage them here.
Managing Plugin Settings
Most plugins have their own settings which you can manage from the WordPress Admin Area. Typically, once a plugin is installed and activated, a new menu item for that plugin appears in the WordPress sidebar, or it adds a new option under an existing menu item like 'Settings', 'Tools', or 'Plugins'.
Remember to carefully manage your plugins and tools. Use only trusted and highly-rated plugins, keep your plugins updated, and deactivate and delete any plugins you no longer need. This will help keep your WordPress site secure, fast, and clutter-free.
Can You Change How The WordPress Admin Panels Looks And Functions?
Absolutely! WordPress is known for its flexibility, and that extends to the WordPress Admin Panel as well.
From simple tweaks to full customizations, there are several ways you can change how the WordPress Admin Panel looks and functions.
Screen Options
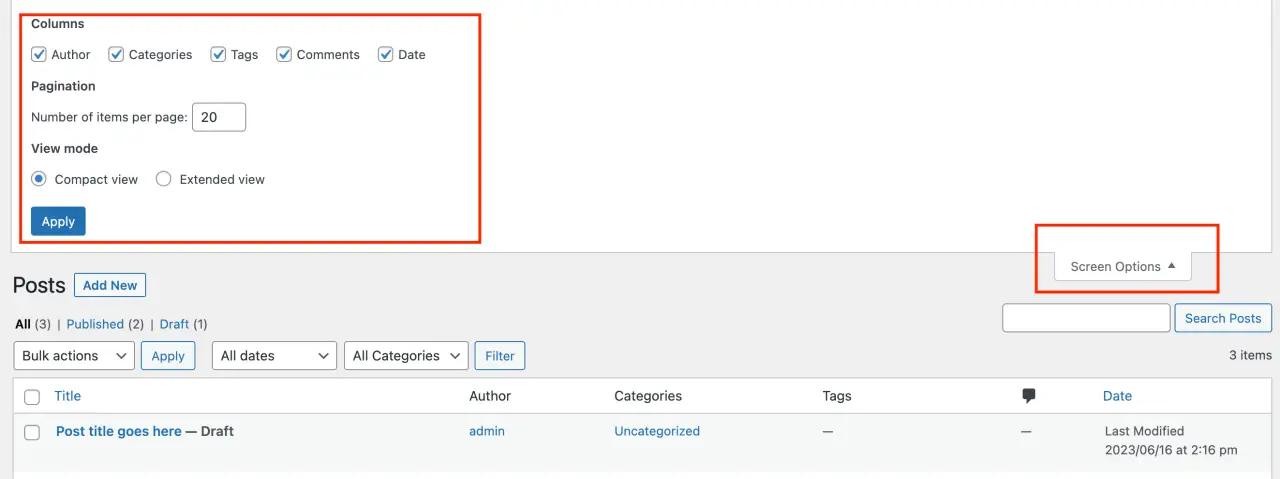
At the top of every page in your WordPress Admin Panel, you'll see a button labeled 'Screen Options'.
This feature allows you to control what boxes are displayed on the admin screen you are currently viewing. This can declutter your workspace by hiding modules that you don't use often.
Admin Color Schemes
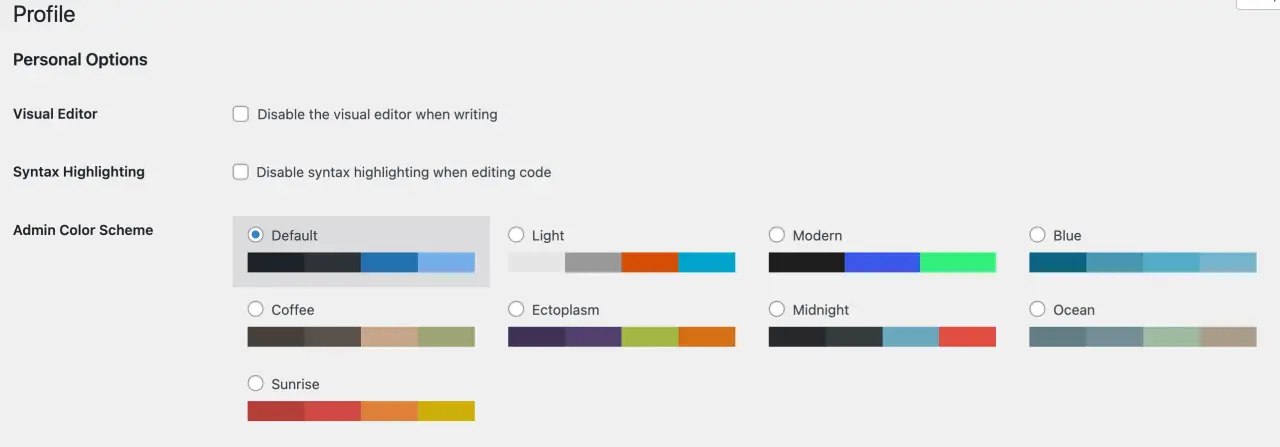
You can change the color scheme of your admin dashboard. Simply go to 'Users' > 'Your Profile', and under 'Admin Color Scheme', you can choose from a variety of predefined color schemes.
If you want to have a custom color scheme, we recommend using ACOS plugin

Admin Theme Plugins
There are several free plugins now available that can change the appearance of your WordPress Admin Panel. Here are some examples:
- Adminimize: This plugin lets you hide 'unnecessary' items from the WordPress backend, and you can also tweak color schemes.
- Pros: It's handy to hide quickly various elements like menu items from the backend with a couple of clicks.
- Cons: It can be hard to manage sites with more users and plugins. Issues with support and regular updates. It can also make your site and dashboard slow.

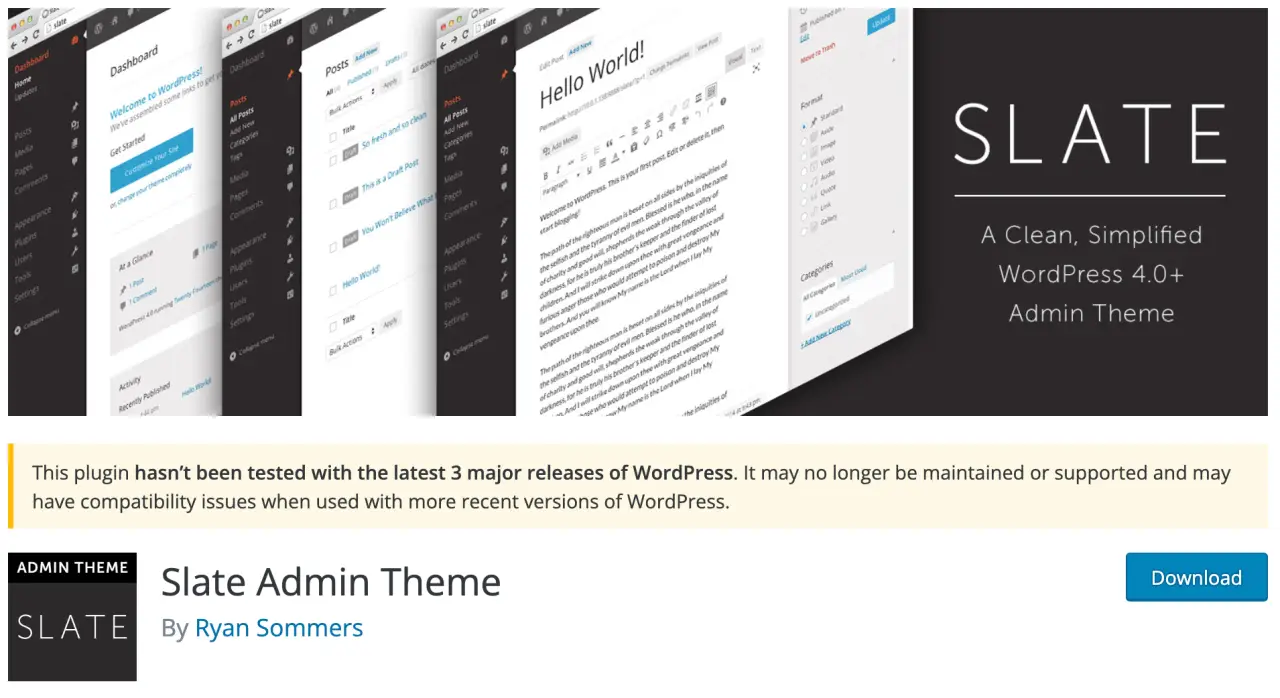
- Slate Admin Theme: Slate Admin Theme simplifies the WordPress dashboard design, providing a clean, simplified design, and removing all WordPress branding.
- Pros: Clean and simplified admin theme
- Cons: Not supported regularly, missing more customization options
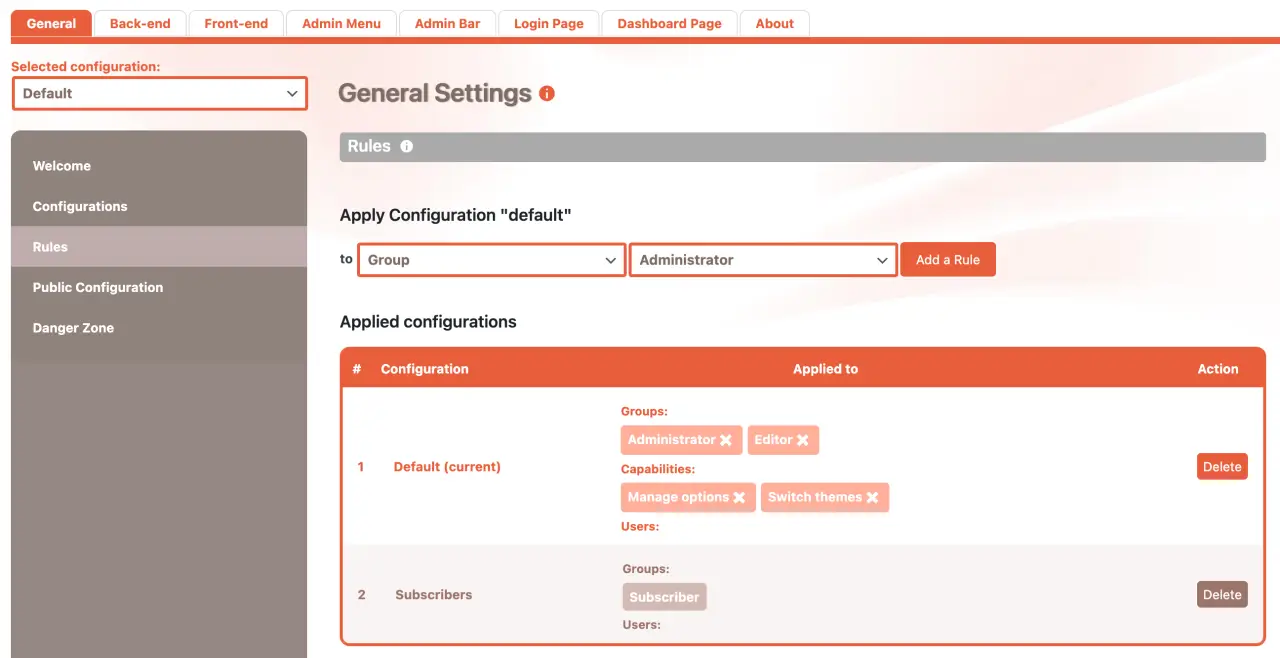
- Cusmin: Everything for WordPress admin dashboard customization in just one plugin, including admin bar editor, admin menu editor, login page editor, colorizer etc.
- Pros: Powerful manager with dozens of options, everything is covered. Does not affect website performance due to advanced caching algorithms.
- Cons: For more advanced users, like agencies. Can have a steep learning curve.
Custom Login Page Plugins
While not directly part of the WordPress Admin Panel, the login page is the gateway to it. There are numerous plugins, like 'Custom Login Page Customizer', 'LoginPress', and 'Theme My Login', which let you design and customize your WordPress admin login page.
With Cusmin, you can customize WordPress admin dashboard, the WordPress admin login page, e.g. login screen, add custom CSS, change WordPress logo, background image, site's title and even change the default login URL.
Custom Functionality
If you're comfortable with PHP and coding, you can further customize your admin panel by modifying your theme's functions.php file or creating a custom plugin.
This could include things like adding custom dashboard widgets, removing unnecessary menus, or even creating custom admin themes. Note: Always back up your site before making any changes to the code.
This code snippet can be used to add your custom CSS to the admin dashboard. Paste it to your functions.php and update "path/to/your.css" to point to your CSS customizations file.
<?php
function add_custom_admin_style() {
    wp_register_style('your-css-name', get_template_directory_uri() . '/path/to/your.css', false, '1.0.0');
    wp_enqueue_style('your-css-name');
}
add_action('admin_enqueue_scripts', 'add_custom_admin_style');?
?>
While the default WordPress admin panel is fully functional and user-friendly, customization can provide a more personalized and efficient experience.
However, excessive modifications can lead to compatibility issues with plugins and updates, with errors in your WordPress events so it's always best to keep changes minimal and necessary.
Managing How Your WordPress Site Looks With The WordPress Admin Area
Managing your website's appearance is one of the key tasks you'll undertake from the WordPress Admin Area.
This involves everything from selecting a theme to customizing individual page layouts, menus, and widgets. Here's how you can manage your site's look and feel from your WordPress Admin Dashboard:
Selecting a Theme
-
Log in to your WordPress Admin Area.
-
Navigate to 'Appearance' > 'Themes'. You'll see a list of currently installed themes.
-
To add a new theme, click on 'Add New'. You can search for a specific theme, or browse by featured, popular, latest, or by specific filters like subject, features, and layout.
-
Once you've chosen a theme, click 'Install' and then 'Activate' to apply it to your site.

Customizing Your Theme
-
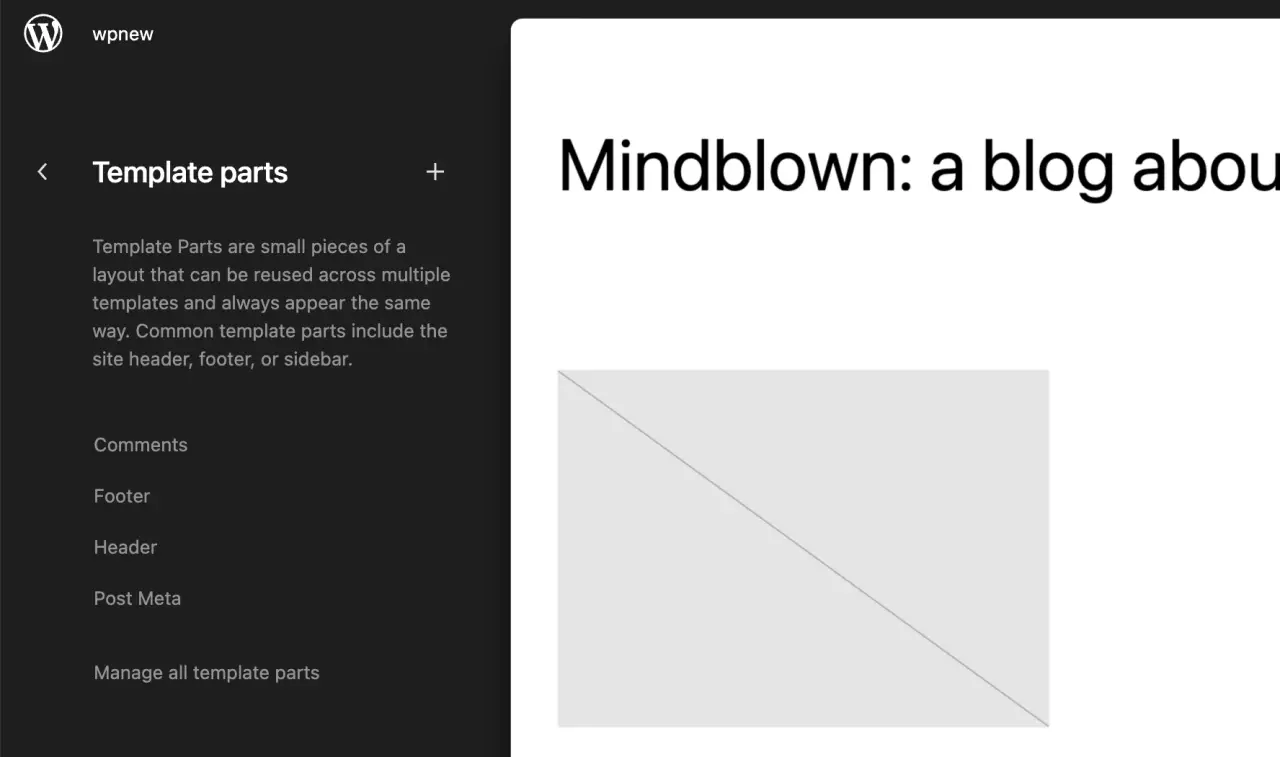
Navigate to 'Appearance' > 'Customize'. This will open the WordPress Customizer.
-
The Customizer's options depend on your theme, but typically you can manage your site's identity (title, logo, tagline), colors, header and background images, menus, widgets, homepage settings, and additional CSS.
-
Any changes made in the Customizer are previewed in real-time. Once you're satisfied, click 'Publish' to apply your changes.
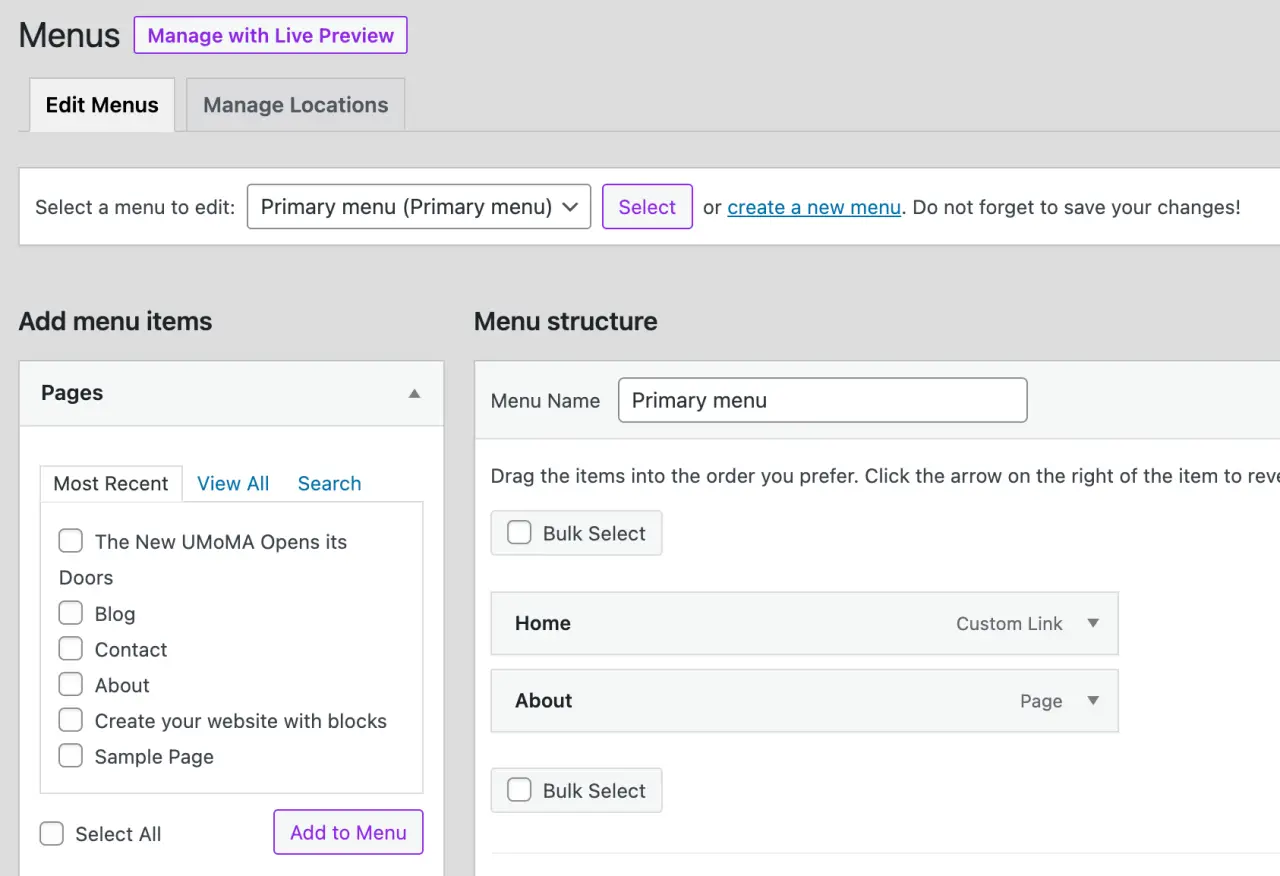
Managing Menus
-
Navigate to 'Appearance' > 'Menus'.
-
Here, you can create new menus, add items to existing ones, and assign them to specific locations (like your header or footer).
-
To create a new menu, click 'create a new menu', give it a name, choose a location, and click 'Create Menu'.
-
You can add pages, posts, custom links, or categories to your menu. Drag and drop menu items to rearrange their order or create sub-menus.
Managing Widgets
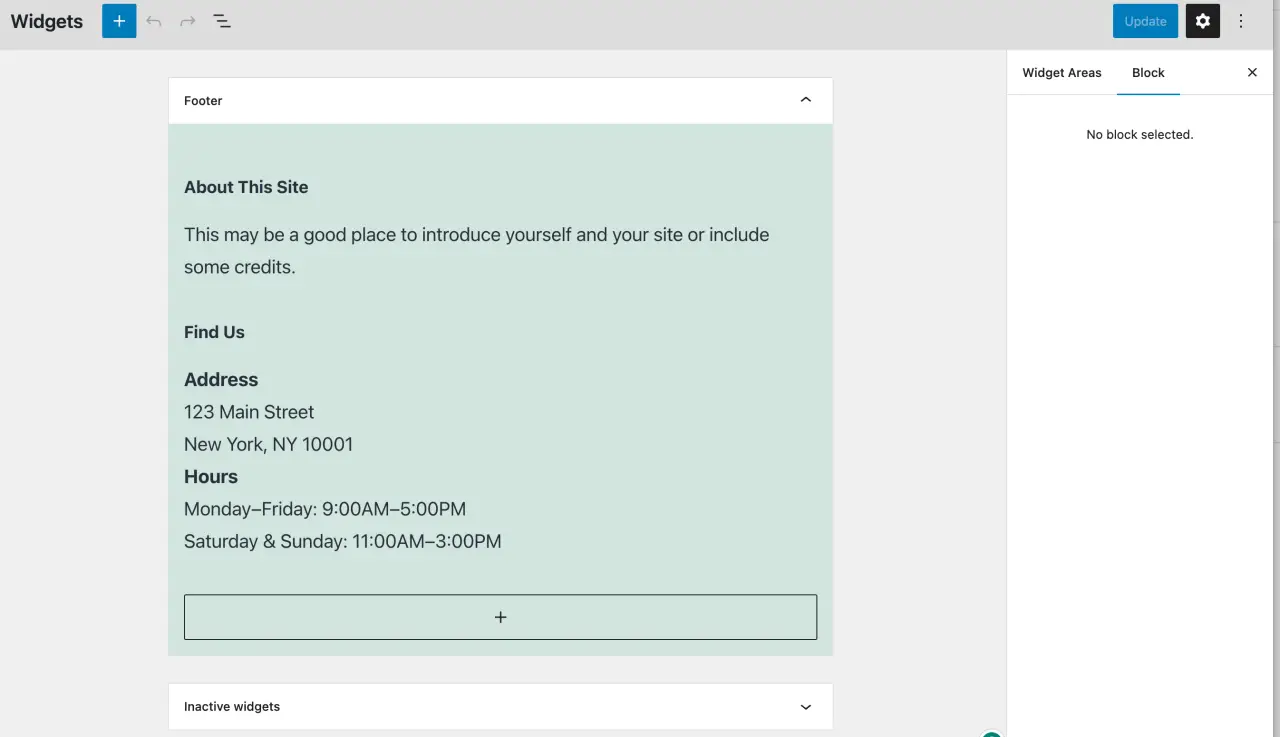
-
Navigate to 'Appearance' > 'Widgets'.
-
Here, you can add, remove, or rearrange widgets in your theme's widgetized areas (like your sidebar or footer).
-
To add a widget, choose a widget on the left, drag it to a widget area on the right, and configure any widget-specific settings.
Installing and Managing Plugins
Plugins can add a variety of new features and functionalities to your site, many of which impact your site's appearance.
For example, page builder plugins allow you to design custom layouts, while SEO plugins can add metadata to your header.
You can manage and install plugins from 'Plugins' in the WordPress Admin Area.
While the WordPress Admin Area offers numerous ways to customize your site's appearance, for more advanced designs, you may need to delve into theme and child theme development, or use page builder plugins like Elementor or Beaver Builder.
Always remember to preview changes and backup your site before making significant alterations.
How to manage WordPress comments
Comments are an integral part of many blogs, enabling a dialogue between you and your readers.
Managing comments efficiently in WordPress is essential to ensure your site maintains a high-quality user experience.
Here's how to manage WordPress comments from your WordPress Admin Panel:
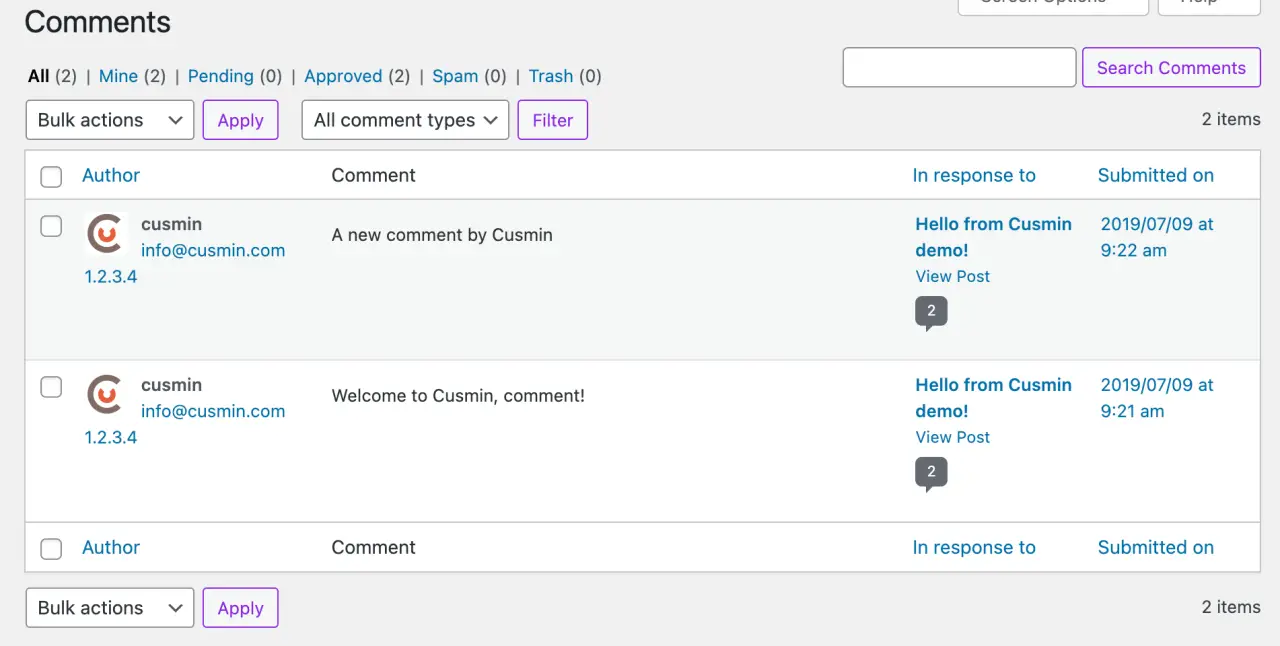
Accessing Your Comments Section
Log into your WordPress Admin Area and click on 'Comments' in the left-hand menu. This will bring up comments screen with a list of all the comments on your website.
Managing Individual Comments
Each comment has a set of options when you hover over it:
-
Approve/Unapprove: This allows you to approve a comment so it appears on your site, or unapprove a comment to remove it from your site.
-
Reply: This lets you reply to a comment directly from the WordPress admin area. This is a great way to engage with your readers.
-
Quick Edit: This allows you to quickly edit the comment's details.
-
Edit: This gives you more extensive options for editing the comment and the author's information.
-
Spam: This marks a comment as spam. It's a good idea to mark irrelevant or inappropriate comments as spam to improve your site's quality and SEO.
-
Trash: This moves a comment to the trash. You can restore comments from the trash within 30 days, after which they are permanently deleted.

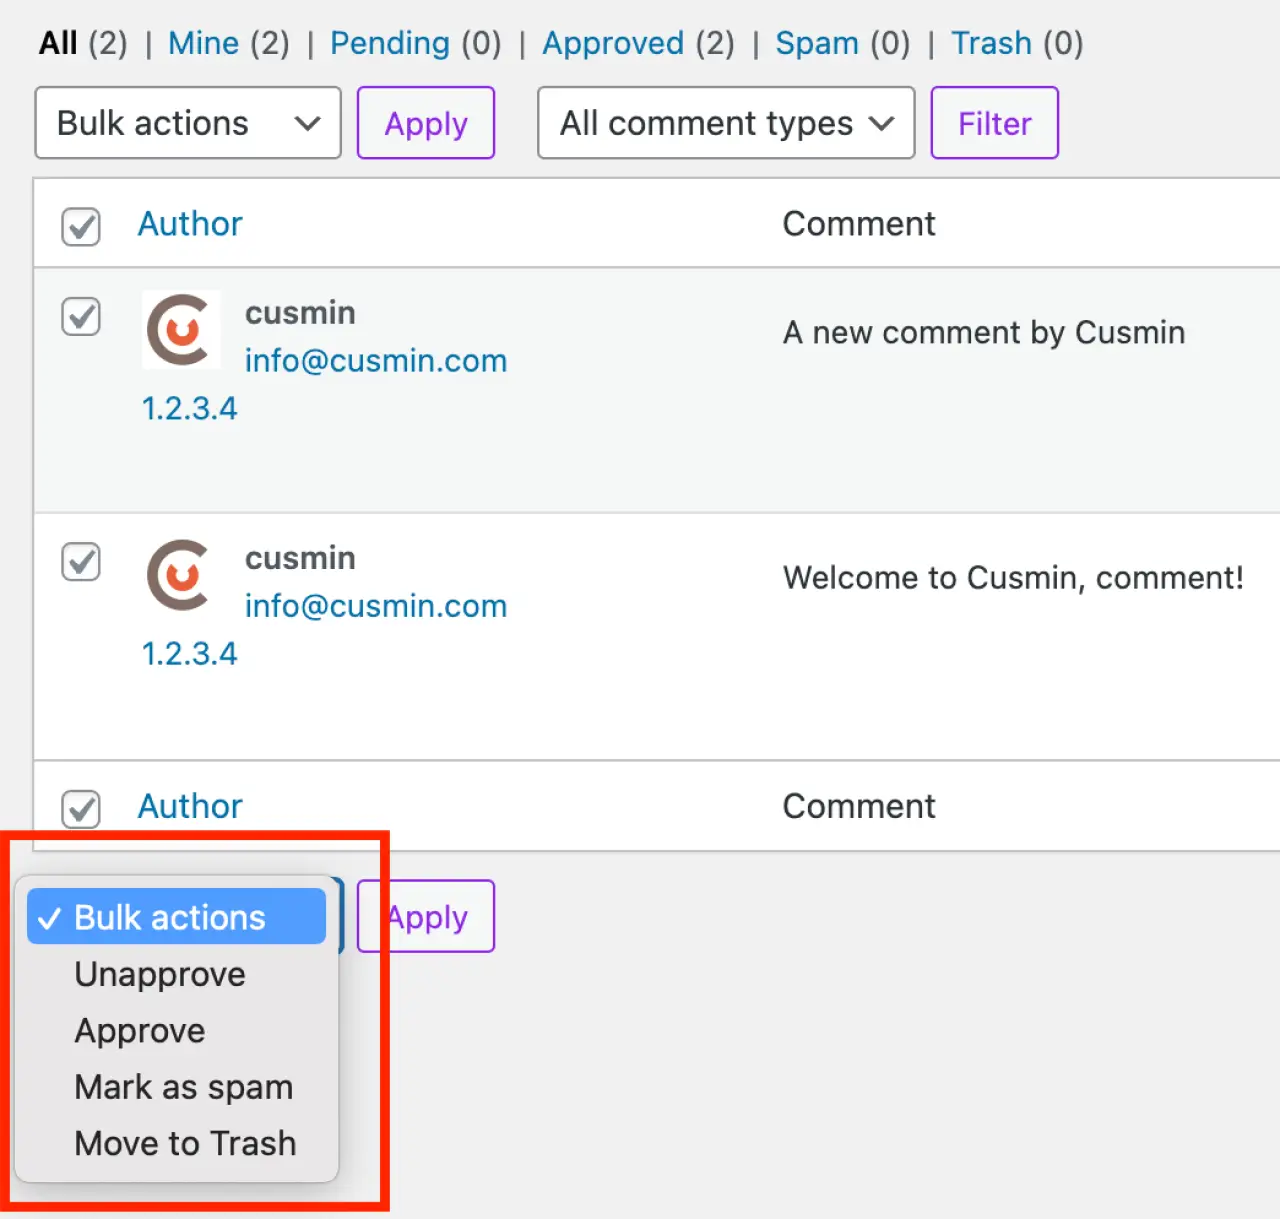
Bulk Actions
If you want to apply an action to multiple comments at once, use the bulk actions feature. Just check the boxes next to the comments you want to manage, select the action you want from the 'Bulk Actions' dropdown, and click 'Apply'.
Comment Settings
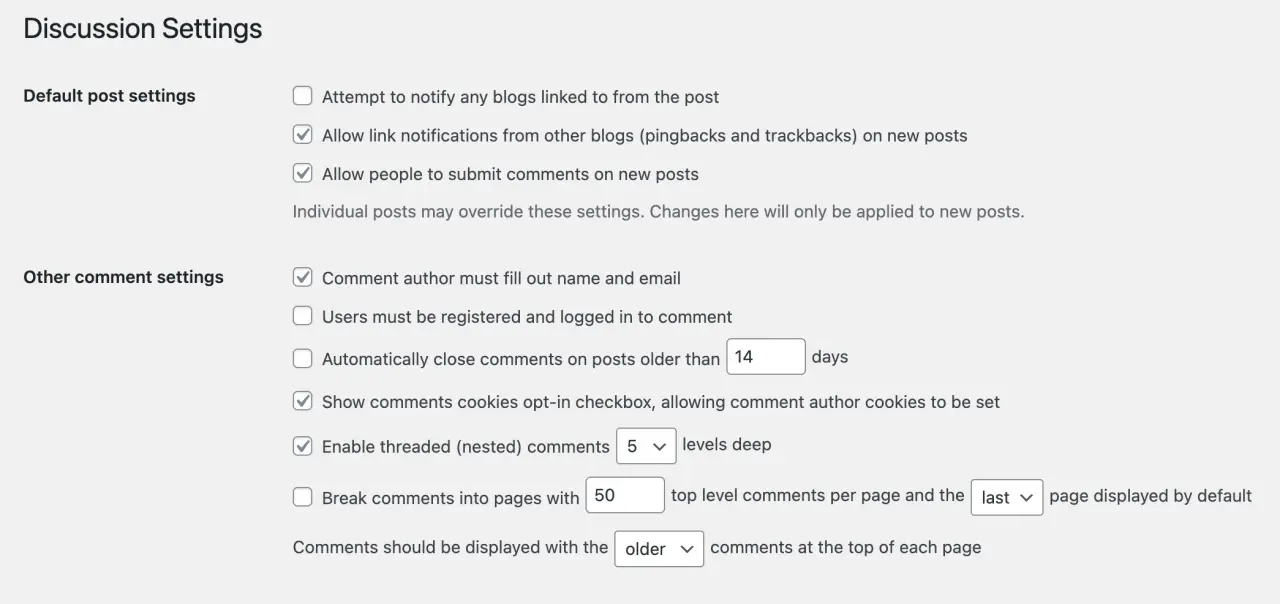
WordPress allows you to set global rules for how comments are managed on your site. You can find these under 'Settings' > 'Discussion' in your WordPress Admin Area. Here, you can decide if comments are allowed, if they must be manually, previously approved comments, if commenters need to register, how many visitors the comments are nested, and more.
Plugins for Comment Management
If you have a high-traffic site, managing comments manually may be challenging. There are several WordPress plugins, like Akismet, that can help by automatically filtering spam comments.
Fostering a healthy comment environment can help build a strong community around your website.
It's equally important to keep a check on spam and inappropriate content. By managing your WordPress comments effectively, you ensure your website remains a valuable resource for your visitors.
How to manage user accounts in WordPress
Managing user accounts in WordPress is an essential task, especially if you're running a multi-author blog, a membership site, or an online store.
WordPress makes it easy to manage users from your WordPress Admin Area. Here's how:
Accessing Your User Accounts
To access your user accounts, log in to your WordPress Admin Dashboard, and click on 'Users' in the left-hand menu.

Adding New Users
To add a new user, go to 'Users' > 'Add New'. You will need to provide a username, email address, and password for the new user.
You can also add the user's first and last name, website, and a short bio, though these are optional. Most importantly, you need to assign a role to the new user.
User Roles
WordPress comes with five default user roles: Administrator, Editor, Author, Contributor, and Subscriber. Each role has a specific set of capabilities:
-
Administrator: Has access to all administrative features.
-
Editor: Can publish and manage their own and other users' posts.
-
Author: Can publish and manage their own posts.
-
Contributor: Can write and manage their own posts, but can't publish them.
-
Subscriber: Can manage their profile.
Choose the role carefully based on what tasks you want the user to be able to perform on your site.
Managing Existing Users
In 'Users' > 'All Users', you can see a list of all users on your site. Hovering over a user reveals options to 'Edit' or 'Delete' the user.
'Edit' allows you to change the user's information and role. 'Delete' removes the user from your site. If the user has content on your site, you can choose to delete the content or attribute it to another user.
Your Profile
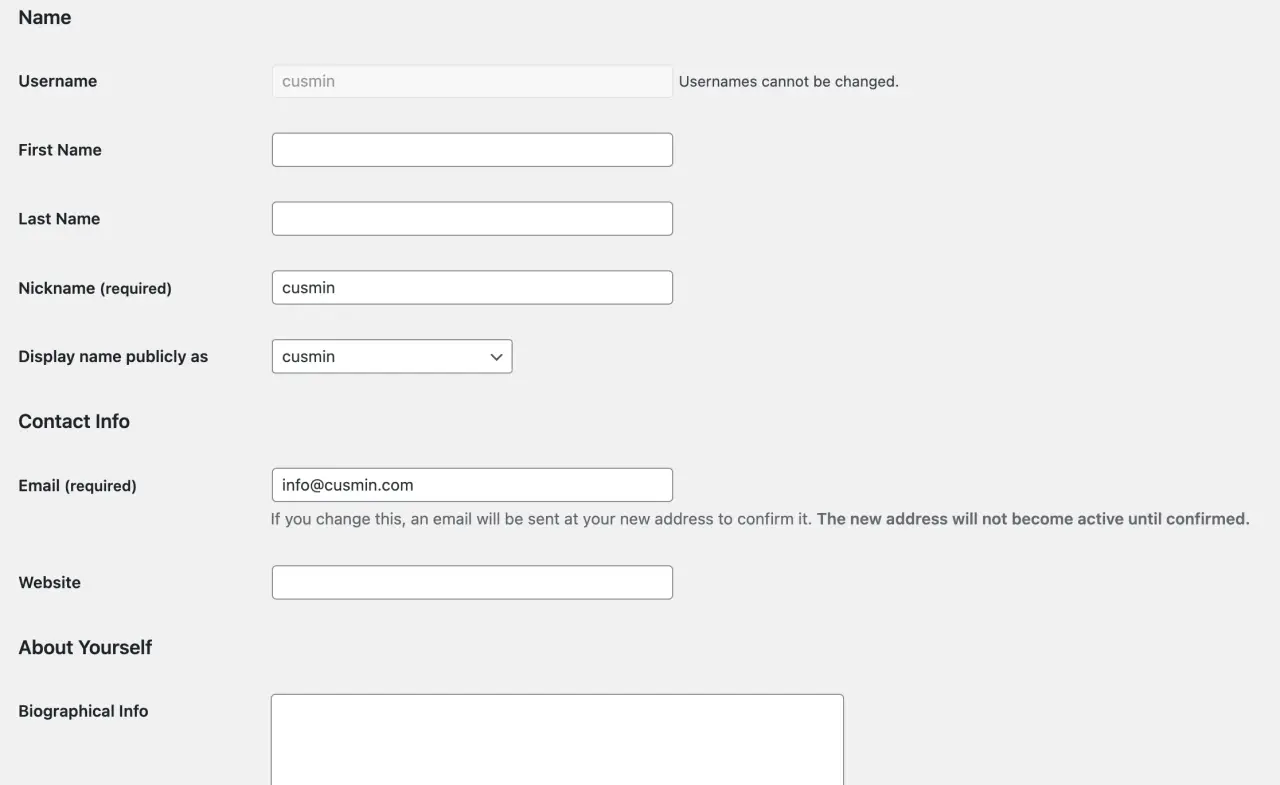
Under 'Users' > 'Your Profile', you can manage your own user profile. Here, you can change your name, contact info, and bio.
You can also choose a color scheme for your Admin Dashboard, enable keyboard shortcuts, and configure the visual editor.
User Settings
You can set global rules for user accounts under 'Settings' > 'General'. Here, you can choose whether anyone can register for your site, and what the default for user account role is for new site registrations.
Giving other users access to your site can be a security risk, so it's important to only give access to people you trust, and to assign the minimum necessary role to each user.
If you're using plugins or custom themes, they may add additional user roles or change the capabilities of existing roles, so always be aware of what capabilities each user role has on your site.
WordPress Media Settings
In WordPress, the Media Settings allow you to determine how media is handled on your site. This includes the default sizes for images you upload and whether files should be organized into month/year folders.
Here's a brief guide on how you can configure these settings from your WordPress dashboard:
Accessing Media Settings
To access the media settings, log into your WordPress Admin Area and go to 'Settings' > 'Media'. This will take you to the 'Media Settings' page.
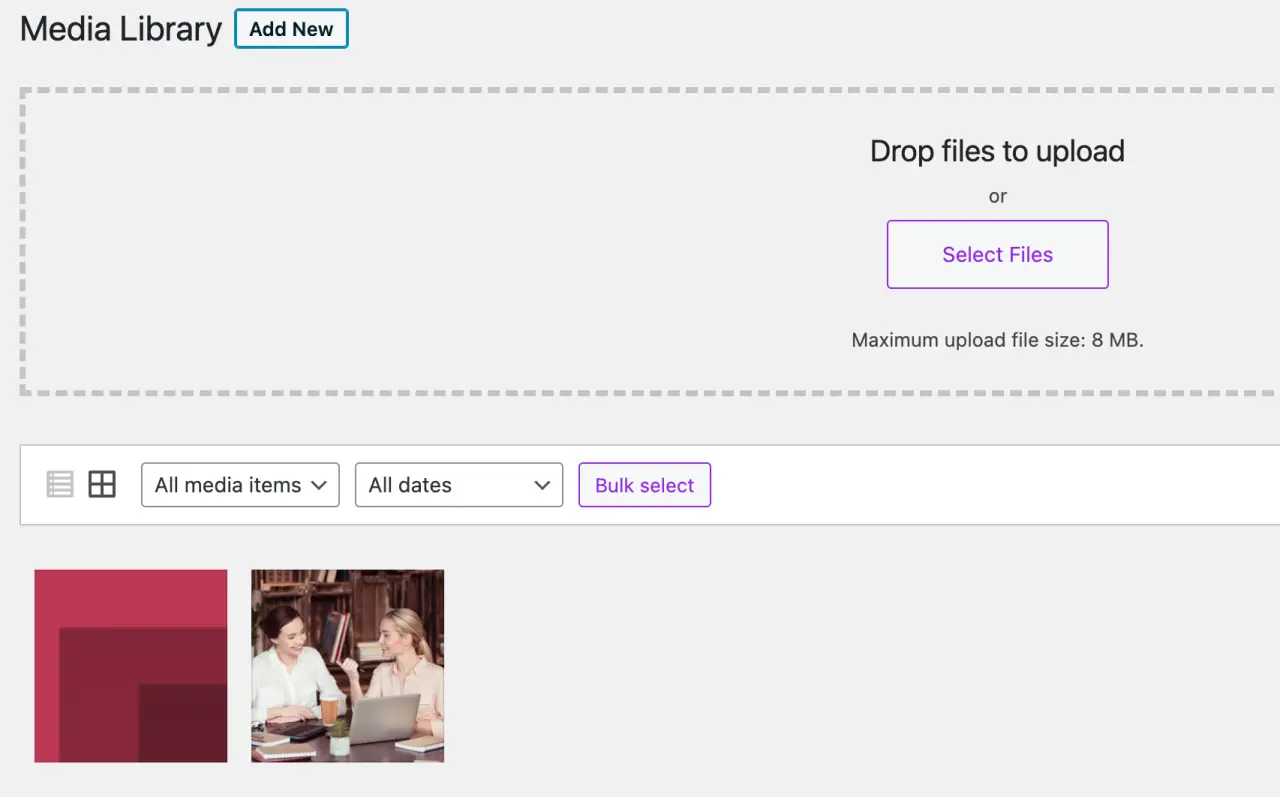
Image Sizes
WordPress automatically creates several versions of each image you upload, each with a different size. You can set the default sizes for these images:
-
Thumbnail size: The size of the thumbnail images. WordPress will crop thumbnails to the exact dimensions you specify.
-
Medium size: The maximum dimensions for medium-sized images. WordPress will scale the image to fit within these dimensions while maintaining the original aspect ratio.
-
Large size: The maximum dimensions for large-sized images. As with medium size, WordPress will scale the image to fit within these dimensions while maintaining the original aspect ratio.
Note that these sizes will only apply to images you upload after changing these settings. If you want to change the sizes for images you've already uploaded, you'll need to use a plugin like Regenerate Thumbnails.
Uploading Files
There's one option in this section - "Organize my uploads into month- and year-based folders". If you check this box, WordPress will create a new folder for each month and year, and store that month's uploads in that folder.
This is especially helpful if you upload a lot of media, as it keeps your uploads organized and easier to manage.
Once you've configured your settings, don't forget to click 'Save Changes' at the bottom of the page.
These settings provide a basic level of control over how media is handled on your site. For more advanced control, like adding new image sizes or changing the JPEG compression level, you'll need to delve into your theme's functions.php file or use a plugin.
As always, remember to backup your site before making significant changes.
FAQs
Administration in WordPress refers to the management and control of the WordPress site from the dashboard or admin area.
You administer WordPress by logging into the admin area where you can create and edit posts, manage plugins and themes, and configure settings.
The administrator has complete control over the WordPress site, including the ability to install plugins and themes, create and edit posts and pages, manage users, and modify any settings.
The default admin page for WordPress can be accessed by adding '/wp-admin' to the end of your website's URL.
The admin menu in WordPress is located on the left-hand side of your admin screen.
WordPress is the overall content management system, while WordPress admin refers to the administrative area where you manage the site's content and settings.
You log in as an admin by navigating to the WordPress admin login page (example/wp-admin), and then entering your admin username and password.
To create a backend admin page in the admin dashboard, you would need to use a plugin like Cusmin, since this feature is not available in WordPress out of the box.
The WordPress admin dashboard is the interface you see when you log into the admin area of your WordPress site.
The admin bar is a floating bar at the top of your site that provides quick access to key admin features when logged in.
You can manage comments in the admin panel by navigating to 'Comments'. Here, you can approve comments, reply, edit, mark as spam, or trash comments.
WordPress can be updated by clicking the 'Updates' option in your WordPress admin area.
A permalink in WordPress is a permanent static hyperlink to a particular web page or blog post on your site.
You can change the permalink structure by going to 'Settings' > 'Permalinks'.
New users can be added in WordPress by going to 'Users' > 'Add New', then fill out the form and click 'Add New User'.
You can change your password by going to 'Users' > 'Your Profile', scroll down to 'Account Management', click 'Generate Password', and 'Update Profile'.
The Media Library in WordPress is where all your media files like images, videos, documents are stored.
You can add images to the Media Library by going to 'Media' > 'Add New', then either drag and drop files or click 'Select Files' to upload.
A widget in WordPress is a small block that performs a specific function, which can be added to your site's sidebars or widget-ready areas.
You can add a widget in WordPress by going to 'Appearance' > 'Widgets', then drag and drop the widget into the desired area.
In WordPress, a 'post' is a piece of content part of a blog or news section and are arranged in reverse chronological order. A 'page' is a static piece of content and is not part of a chronological list.
You can create a menu in WordPress by going to 'Appearance' > 'Menus', name your menu and click 'Create Menu'. Then you can make navigation menus, add items, arrange them, and assign the menu to a location.
Categories are broad groups that multiple posts can belong to, while tags are specific keywords that describe the content of a post. Both are used to organise content.
You can add categories in WordPress by going to 'Posts' > 'Categories', fill in the 'Name', 'Slug', 'Parent Category' (if it's a sub-category), and 'Description', then click 'Add New Category'
You can optimize your WordPress site for SEO by installing an SEO plugin like Yoast SEO, writing high-quality content, using keywords appropriately, ensuring your site is mobile-friendly, and creating backlinks to your site.
The WordPress REST API is an interface that developers can use to access WordPress from outside the WordPress installation itself. You can retrieve your site's data in simple JSON format, including users, posts, taxonomies etc.
A page builder is a plugin in WordPress that provides a user-friendly, WordPress editor with drag-and-drop interface to build custom layouts and designs, without any coding knowledge.
Gutenberg is the block-based content editor in WordPress. It replaced the previous TinyMCE editor, and allows users to build and edit pages
Conclusion
Mastering your WordPress admin area can significantly streamline your website management and design process.
From the WordPress admin page to the intricate details of the WordPress control panel, understanding each aspect of the WordPress site admin functionalities can give you the confidence to optimize and customize your website to your liking.
At the end of the day, the WordPress administration panel is not just a tool; it's your creative space. Don't be afraid to explore, experiment, and make the most of it to create a unique and engaging online presence.
Comments
